EngageCX 12.0 (Nido) Sysadmin Guide
Getting Started
Overview
About EngageCX Develop
EngageCX Develop provides a full set of features to support system integrators and software engineers in building systems that need complex and reliable document production capabilities.
Audience
This guide is designed to help system administrators to set up, configure and utilize the EngageCX Develop.
Contact Us
If you encounter any issue while using the EngageCX Develop, do not hesitate to contact us, at engagecxsupport@mhcautomation.com.
System Overview
This section introduces the main components and provides a general overview of the entities and tools you will use to configure and manage the solution on your system.
Components
EngageCX Develop contains the following components:
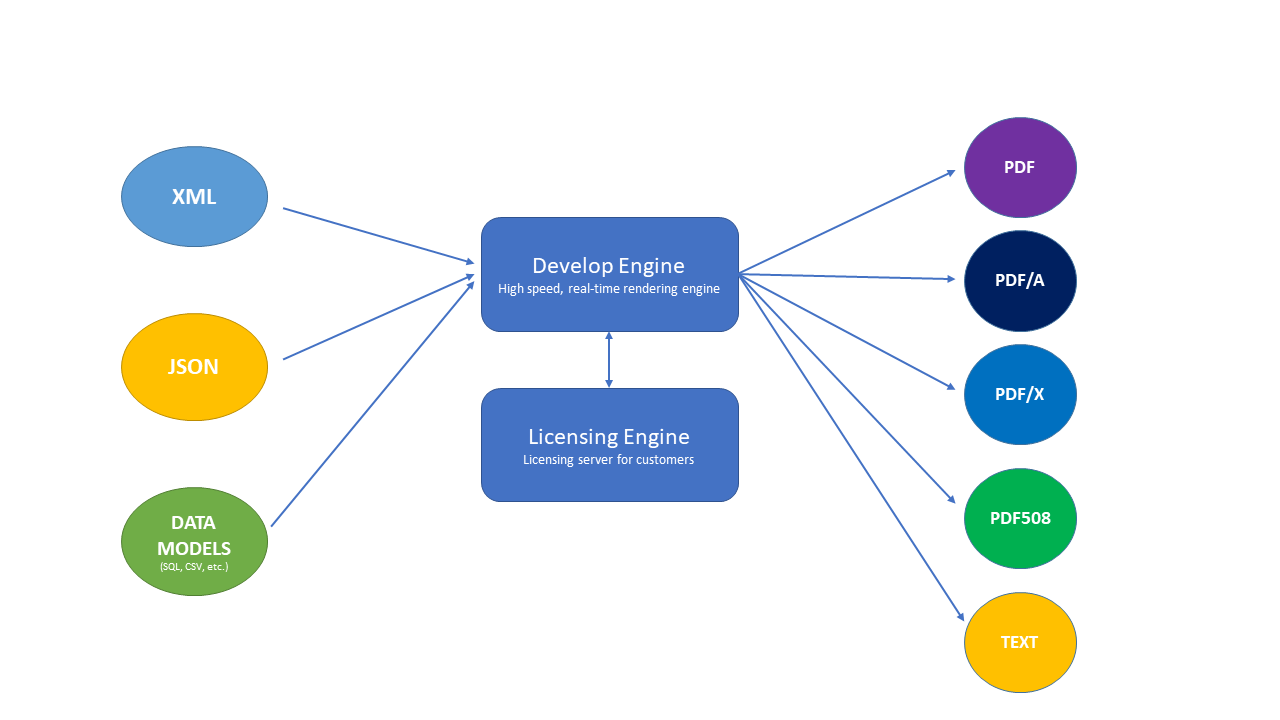
- Develop Engine: A server component that performs XML/JSON conversion to various output formats. It is installed as a service in Windows Services.
- Licensing Engine: An EngageCX component that allows administrators to manage EngageCX Develop product keys.
Files & Folders
System files for EngageCX Develop are placed in the following locations:
Application Installation Folder
This is where the product is installed. The installation directory contains all the binaries required for the EngageCX Develop components.
On Windows environments, you can set a custom installation folder during the installation wizard run.
In a default installation, it is located at:
- On Windows OS: C:\Program Files\EngageCX\
- On Linux OS: /opt/EngageCX/
Application Data Folder
This directory contains the configuration files for the EngageCX Develop components.
In a default installation, it is located at:
- On Windows OS: C:\Program Data\EngageCX
- On Linux OS: /opt/EngageCX/Common/EngageCX
Configuration File
EngageCX Develop uses a configuration file to enable various functionalities. It is loaded on start-up by the EngageCX Develop Service (EngageCX Develop Engine).
The configuration file is created automatically on Windows, and it is called PublisherSvc.config. In Linux environments, it has to be created manually and saved with the following name - UDaemon.config.
The configuration file location is:
- On Windows OS: %Application_Data%\EngageCX\PublisherSvc.config
- On Linux OS: /opt/EngageCX/Common/UDaemon.config
Note
Any changes made to the config file require a restart of the service. Follow the steps provided below to restart the service, based on your OS
Windows OS
There are multiple ways to restart the EngageCX Develop service on Windows. Here are two of the common ways for restarting the service:
- Access Windows Task Manager, navigate to the Services tab and restart the
EngageCX Develop Engineservice. - Access Management Console, navigate to Server Manager > Configuration > EngageCX Develop Engine in the left pane tree view, then use the three buttons from the right to stop, start or restart the service:
Stop Service,Start ServiceorRestart Service.
Linux OS
- To manually start the service, the following command must be run:
service ultrascaled start - To stop the service, the following command must be run:
service ultrascaled stop - To restart the service, the following command must be run:
service ultrascaled restart
Repository
This section provides an overview of the files and users existing with the Develop solution.
Workspaces
EngageCX workspaces enable collaboration and storage of all assets involved in your customer communication management processes. These are logical divisions and allow you to store document templates (EPR, EPB, XSL, etc.), along with other dependencies assets (such as images, translations, etc.) for processing XML/JSON input into external documents.
In EngageCX Develop, document templates can be classified as local templates or server templates. The primary difference between a local and a server template is where your XSL Transformation takes place and not just where the template resides. When using local templates, the XSLT is performed on the client side and the computed XSL-FO is passed to the server for the rendering job. When using server templates, both transformations and rendering operations are performed on the server-side. Server templates can be configured from Management Console, on Windows environments, or through config parameters, on Linux.
Creating a New Workspace
This section provides step by step instructions for creating a new workspace for your server templates in EngageCX Develop.
Windows OS
If the server is running on Windows, follow the steps below:
- In Management Console, expand the Server Manager > Configuration > EngageCX Develop Engine from the left tree view pane.
- Select
Workspaces, then use theAddbutton from the top-right side to create your own-brand new workspace. - You will be prompted to enter a name for your Workspace. Next, use the drop-down menu to select the XSLT engine you want to use when your document template is processed by the server. The XSLT engine is useful because in reality, different templates can use different XSL components, and you're much better off with selecting the needed processor at the beginning. The available engines are: Auto , MSXML , .NET 2.0 XSLT Parser or SAXON Parser. Internal parser can be used when
Use EngageCX Internal Compiled Template Moduleis checked. - Once you're ready, select OK.
Your workspace will be added into the Workspaces list. By default, locally it will be saved in the application data folder location. (for example, C:\ProgramData\EngageCX\ServerTemplates).
Setting Up Server Templates
A workspace can contain one or more template files (EPR, XFD or XSL), images (PNG, JPG, TIFF, SVG, etc.), translation files (TXT), content fragments (EPB, XFC), and other resources used to produce the required output.
In order to make edits, the desired workspace must be double clicked. Within the Workspace dialog, you can select from several options, such as:
| Add File | New Folder | Edit | Delete |
| XSLT Engine | Restart the service | Users |
Adding Files
Follow the steps below to add a document template or other associated resources to your workspace, on a Windows OS:
- Starting from the workspace edit dialog, use
Add File..to add new templates to the current workspace. - In the Add File dialog, click
Browseto navigate the file system and add the needed template. - The
ServerTemplateIDwill be automatically completed once a template is selected. It is a unique identifier that you can send to the server to specify the template you want to use as an input. It uses a two-pair combination string like WorkspaceName:TemplateName. - When a new template is added to your workspace, it can be either copied into the workspace folder, or it can be only referenced from its existing location, process also called as
Add as shortcut. - Once you're ready, select OK. Your template is now added to the workspace.
Creating Sub-Folders
Within workspaces, you can create one or multiple sub-folders to arrange your assets into categories for easy access (for example, create a separate folder to store fragments, a separate folder for images, etc.).
- Starting from the workspace edit dialog, use
New Folder..to create a new folder into the current workspace. - You will prompted to enter a name for your folder.
Editing Workspace Files
Follow the steps below to edit a file presented into your workspace:
- Starting from the workspace edit dialog, select a file you want to edit, then click on the
Edit..button. - In the prompted dialog, you can either select another file or select the way the file is added to the workspace (copied or as a shortcut). Note that once a new file is selected, the
ServerTemplateIDwill be automatically updated.
Deleting Workspace Files
Follow the steps below to remove a file presented into your workspace:
- Starting from the workspace edit dialog, select the file you want to remove, then click on the
Deletebutton. - Confirm the deletion by selecting OK. Your file will be now removed from the EngageCX workspace.
Note
When the file is referenced as a shortcut from it's original location, only the shortcut will be removed and the file remains untouched.
XSLT Engine
To update the XSLT Engine used on the selected workspace, follow the steps below:
- In the Workspace edit dialog, use the Xslt drop-down menu to select the engine to use when applying XSL Transformations to generate XSLFO from XML. By default, MSXML is selected. Available values are : Auto, MSXML, .NET 2.0 XSLT Parser or Saxon Parser.
The difference between the available values is the platform which they use : * MSXML - C++ * .NET 2.0 XSLT Parser - C# * Saxon - Java
Tip
The best rendering speed can be achieved by setting the engine to MSXML.
Access Control
By default, a workspace file will be accessible to all users. As an administrator, you can grant or deny access to the workspace assets by selecting the Users.. button within the Workspace edit dialog. To grant or deny access only to a specific file, select the file into the Workspaces dialog, then click on the Users.. button.
Warning
Disabled users cannot access an application regardless whether or not they have been granted access to it.
- To grant a user access, select the
Grant Accessbutton. From the Grant Access To dialog, choose the user on which you want to grant access from the drop down list. - To deny access to a user that already has access, the user must be selected from the Server Application Users dialog and then the
Deny Accessbutton selected. The Delete dialog will be displayed, where the deletion must be confirmed.
To learn more about Users, please access the Users section of this guide.
Restart the service
Whenever you apply a change to a workspace, you must restart the server to apply the changes. By keeping the Restart the service to apply changes option checked, a service restart will be applied automatically after selecting Ok.
Linux OS
If the server is running on Linux, follow the steps below:
- Access the /opt/EngageCX/Common/EngageCX/ServerTemplates folder.
- Create a new folder (for example, ServerApplicationSample), then copy the template (for example, SampleTemplate.epr) and any additional resources in it (images, content fragments, etc.)
- Create a file named Application.config and insert the following line:
AllowTo=Guest;
- Restart the service.
- To test the created server application, use the following command:
Render -xml xmlfile.xml -parameters:servertemplateid=ServerApplicationSample:SampleTemplate.xfd
Note
The server template's id that will be used when rendering documents will be ServerApplicationSample:SampleTemplate.xfd.
Users
EngageCX allows you to define users in Management Console, then grant or revoke their access to different files within your workspaces.
If a client requests a rendering job, it will be required to log in by providing a user name and password to the server.
This section offers information on how to manage users in Windows environments.
Adding New Users
- In Management Console, expand the Server Manager > Configuration > EngageCX Develop Engine from the left tree view pane.
- Select
Users, then use theAddbutton from the top-right side to create your user. - Next, fill in the form fields with the user details. You will have to enter a username and a user password. Keep the
Restart server to apply changesoption checked if you want your changes to be considered. - Each user can be enabled or disabled by selecting the
Enable usercheckbox. When a user is disabled, it will not be able to log in or perform tasks. - Once you're ready, select OK. Your user appears now in the Users list.
Within the Users list you can also see a pre-existing Guest account, which can be disabled but cannot be deleted. This is the default account used for any client that does not authenticate itself.
To learn how to grant or deny user access for a specific file, please access the Access Control.
GUI Adds-On Tools
To handle system settings and use rendering features easier, EngageCX provides two Windows GUI-based management tools, available when installing the EngageCX Develop product:
Management Console
This tool includes a collection of basic to advanced administrator configurations to help you manage easier the EngageCX server.
Accessing Management Console
From Windows Start Menu
- Click on the bottom-left Start button to open the Windows Start Menu.
- Type
Management Consolein the search box and select ManagementConsole in the results.
From Installation Folder
- Access the EngageCX product installation folder. (e.g. C:\Program Files\EngageCX\Develop 2018 (64 bit)) and access the
Binsub-folder. - Scroll down and look after the
ManagementConsole.exe. Double-click on it to open it.
For in-depth details over the configurations available in Management Console, please access the System Configurations section of this guide.
Command Center
This tool was designed to help users to quickly test and render desired document outputs by only adding their input templates and data source.
Accessing Command Center
From Windows Start Menu
- Click on the bottom-left Start button to open the Windows Start Menu.
- Type
Command Centerin the search box and select CommandCenter in the results.
From Installation Folder
- Access the EngageCX product installation folder. (e.g. C:\Program Files\EngageCX\Develop 2018 (64 bit)) and access the
Binsub-folder. - Scroll down and look after the
UCommandCenter.exe. Double-click on it to open it.
For in-depth details over the functionalities available in Command Center, please access the Command Center section of this guide.
Licensing
After deploying the EngageCX solution, you will need to install and activate the product key(s). This section provides guidelines on how to use the Licensing Engine to set up the product keys.
Product Keys
EngageCX solutions cannot be used until they have been licensed. After you download and install the EngageCX Develop, you are given the rights to use it through the product keys you have purchased. Each product key dictates what features or components are available and how long can it be used.
Note
To obtain a product key or learn more on what is the best solution for your needs, please reach out to your Customer Success Executive, or contact us at engagecxsupport@mhcautomation.com.
The Develop product keys can be of two types, volume-based keys or LCPU-based keys. The volume product keys are tailored to the size of the documents you want to generate, while the LCPU-based product keys come with limit to the number of logical processors available on your system.
In addition, the new licensing system allows you to distribute and use multiple EngageCX workers (e.g. engines) with the same product key, sharing the product key limits. For more information on how to set up multiple workers to connect to the Licensing Server, please access this [link].
Licensing Tool
The EngageCX Develop keys are managed by the Licensing Tool, available after deploying the Licensing Engine component. It can be access through a Command Line interface
Follow these steps to access it:
- Navigate to your product installation folder, find the Bin subfolder and open a command prompt to this location. For example, C:\Program Files\EngageCX\Develop 2018 (64 bit)\Bin .
- To view a list of command instructions, enter
LicensingServerTools.exe.
CLI Commands
The Licensing Server tool uses the following general syntax:
LicensingServerTools.exe
    -get-account-product-keys -account <accountName> -password <password>
    -get-licensing-info
    -install-online -product-key <product key id> -account <accountName> -password <password>
    -unistall-online -product-key <product key id> -account <accountName> -password <password>
    -create-install-request
    -install-offline -accounts-install-response <accountsInstallResponse>
    -uninstall-offline -product-key <product key id>
Quick Reference
The table below provides a quick reference to the parameters and options available for the Licensing Server tool.
| get-account-product-keys | Displays the list of available product keys from Accounts website |
| get-licensing-info | Displays the list of product keys installed on Licensing Server |
| install-online | Install a product key online |
| uninstall-online | Uninstall a product key online |
| install-offline | Install a product key offline |
| create-install-request | Creates a request code to the Licensing Server |
| uninstall-offline | Uninstall a product key offline |
Available Product Keys
Run the command below to retrieve a list with all the product keys available in your EngageCX Account:
LicensingServerTools.exe -get-account-product-keys -account <accountName> -password <password>
The command sends a request to the EngageCX Licensing Server to retrieve all the product keys available for the EngageCX Account specified. The return type will be a key-value pair parameter, such as [productKeyId, productKeyName].
Installed Product Keys
Run the command below to view all the installed product keys on your system, along with information regarding expiration date or volume/LCPU usage:
LicensingServerTools.exe -get-licensing-info
The command sends a request to the Licensing Server to retrieve all the installed product keys. The return type will be a key-value pair parameter also, such as [productKeyId, productKeyName, expirationDate, maintenanceExpirationDate, Usage].
Online Install
If your machine is connected to the Internet, it is recommended to perform the Online Installation procedure to install the product keys. Run the command below to install a key online:
LicensingServerTools.exe -install-online -product-key <productKeyId> -account <accountName> -password <password>
The command makes a request to Licensing Server to get the computerGUID for the further usage of it and the productKeyId to generate an install request associated with the EngageCX Account. This request is sent to ecrion.accounts.com to obtain a response that will be used in the installation of the corresponding product key.
Offline Install
If your machine is behind a firewall or proxy (or with no Internet connection), you can always follow the Offline Installation procedure to install the product keys.
Step 1: Create the Install Request
Start by sending a request to the Licensing Server to retrieve the GUID. This data will be helpful for creating an install request, then encrypting and transforming it into a key string which is found on your customer account. To obtain the install request, run the following command:
LicensingServerTools.exe -create-install-request
Step 2: Copy the Install String to Your Account
Next, copy the install request received at Step1, then access your EngageCX Account\Product Keys. Select the product key you want to install and paste the string into the Install Product Key dialog. Select Install in the dialog to finish the process. At the end, you will be provided with an install response string that must be copied to clipboard
Step 3: Install and Activate
The next step is to install the product key on your offline machine by using the string retrieved at Step2 and the command below:
LicensingServerTools.exe –install-offline –accounts-install-response <AccountsInstallResponse>
This will send the response in order to install the Product Key to Licensing Server.
Uninstall Online
In order to uninstall a product key online, use the following command:
LicensingServerTools.exe -uninstall-online -product-key <productKeyId> -account <accountName> -password <password>
This command makes a request to the Licensing Server to uninstall the Product Key based on the specified ID.
Uninstall Offline
If you are trying to uninstall a product key on a computer behind a firewall or proxy (or with no Internet connection), you will need to perform an Offline Uninstallation. To achieve this, use the following command:
LicensingServerTools.exe -uninstall-offline –product-key <productKeyId>
The command will send an uninstall request to the Licensing Server using the specified Product Key. Next, you have to copy and paste the encrypted response to ecrion.accounts.com under the Uninstall Product Key dialog. Then, select Uninstall to successfully uninstall the product key.
Workers Connection
EngageCX provides the ability of setting up multiple engines (workers), each of this pointing to the same Licensing Server and using the same product key. This option is available by configuring the LicensingServerUrl parameter on each worker. When configured, the workers will use the same product key, but will share the product key limits.
Follow the steps below to connect one worker to the Licensing Server:
- Go to the EngageCX Develop application data folder. In a default installation, it should be C:\ProgramData\EngageCX.
- Open the PublisherSvc.config file in a text editor.
- Add the parameter below, then save the file:
LicensingServerUrl=<LicensingServerIP>
- Restart the EngageCX Develop service to make use of the changes. When multiple workers, follow this procedure on each of the workers.
Notification Services
EngageCX Develop allows system administrators to setup the engine in order to receive notifications in Event Viewer when the product keys are about to expire or the volume is about to be consumed.
Follow the steps below to setup email notifications:
- Navigate to your product installation folder, find the Bin subfolder and open a command line to this location. For example, C:\Program Files\EngageCX\Develop 2018 (64 bit)\Bin.
- Run the command below through the Licensing Server tool.
LicensingServerTools.exe -configure-email-server -server-name <server name> -port <port> -username <username> -password <password> -from <sender email> -recipients <recipient1; recipient2> -encrypt <true|false>
For example:
LicensingServerTools.exe -configure-email-server -server-name 127.0.0.1 -port 1234 -username Mike -password Pass012 -from mike.sysadmin@company.com -recipients email.address.1@co.com;email.address.2@co.com -encrypt true
Notification Settings*
Additionally, you can use the parameters in the table below to configure the e-mail notifications frequency. The parameters should be added in the LicensingServer.config file, located by default C:\ProgramData\EngageCX.
| Parameter | Description | Value |
|---|---|---|
| NotificationsWarningPercent | Percentage that shows when volume is 90% consumed. | 90 (by default) |
| NotificationsWarningDaysTillExpire | Start notifications with 5 days before a license expires. | 5 (by default) |
| NotificationsCheckIntervalSeconds | Interval in seconds in which the product keys are verified. | 3600 (by default) |
| NotificationsEventViewerId | The ID that is written in the event viewer. | 3210 (by default) |
| EnableNotificationsEmail | Enables email notifications. | true (by default) |
| EnableNotificationsEventViewer | Enables the event viewer notifications. | true (by default) |
- If the email server is configured and the EnableNotificationsEmail parameter is set to true, then the email notifications will be sent.
- If the email server is not configured, event if the EnableNotificationsEmail parameter is set to true, no email notifications are sent.
** * ** These settings are available only in Nido Patch 6 and later versions.
System Configurations
In this section you can learn how to manage various features and configurations that comes with the EngageCX Develop tool, on both operating systems, Windows or Linux.
Data Connections
This topic describes how to connect Studio Drive to various data connections through Management Console, on Windows environments.
Adding New Data Connections
To add a new connection, go to Server Manager > Configuration > EngageCX Develop Engine > Data Connections and click on the Add button from the top-right.
The Add Connection dialog where the connection's parameters can be added will be displayed.
Depending on the Provider Type there are different parameters that must be set:
Microsoft Access Database File
For a Microsoft Access Database File provide the following information:
- Connection Name - the name given to the connection
- File Path - the location where the database can be found
- User Name - the user name used for logging on the database
- Password - the password used for logging on the database
Microsoft ODBC Data Source
For a Microsoft ODBC Data Source provide the following information:
- Connection Name - the name given to the connection
- Data Source - the location where the database can be found
- User Name - the user name used for logging on the database
- Password - the password used for logging on to the database
Microsoft SQL Server
For a Microsoft SQL Server provide the following information:
- Connection Name - the name given to the connection
- Server Name - the server's name
- Database Name - the name of the database that will be used
- User Name - the user name used for logging on to the database
- Password - the password used for logging on to the database
Oracle Database
For an Oracle Database provide the following information:
- Connection Name - the name given to the connection
- TNS Name - the location of the database
- User Name - the user name used for logging on to the database
- Password - the password used for logging on to the database
Custom
A custom connection to the database can be created by the user, according to the desired settings.
Advanced Connection Settings
All the parameters set when Adding New Data Connections are stored in a Connection String that can be found when selecting the Advanced from the Edit Connection dialog. The connection string of an existing database can be edited using the Advanced dialog.
Server Certificates
Server Certificates allows managing certificates for digitally signed PDF documents.
Windows OS
If the server is running on Windows, follow the steps below:
Installing Server Certificates
- Go to Server Manager > Configuration > EngageCX Develop Engine > Server Certificates and select on the
Installbutton to display the install wizard. - Select between a self-signed certificate or a certificate issued by a Certification Authority. Usually a self-signed certificate will have a different subject and issuer field, but it is guaranteed. A good identifier will be that self-signed certificates will not contain an authority key identifier.
- Depending on the certificate type selected, provide the required information.
Self-Signed Certificate
If you have selected to install a self-signed certificate, set the certificate's details in the Generate Certificate dialog. Information such as organization, organizational, domain, country, address, state/province, city/locality, zip and email will be requested.
Note
In the Management Console, when creating a self-signed certificate, the Server Certificate Request Key lengths should be at least 2048.
Certificate issued by a Certification Authority
If you have selected to install a certificate issued by a Certification Authority (CA), you may be prompted to select between two options:
- Prepare certificate request to send to a certification authority: here you will prompted to provide information such as organization, organizational, domain, country, address, state/province, city/locality, zip and email. You will have the option to save the request to an external file in S/MIME format, under Certificate Request File Name dialog.
- Process pending request and install certificate: here you will be prompted to select a private key. The path where the .pfx or .p12 file containing the certificate must be type in. Also, if the certificate is password protected, the user must enter the password in the Password field. Otherwise, the field can be left blank.
Linux OS
UCertManager is the certificate management tool used to install/uninstall public certificate/private keys pairs (digital identities).
Here is a brief list of commands:
List identifies
The command below lists all the identifies from the container (index in the container, issuer and subject):
UCertManager list
Import PKCS#12
The digital identity information is added to the container:
UCertManager import pkcs12_file
Import a certificate/private key pair (PEM format)
The digital identity information (the private key and its ownership certificate) is added to the container:
UCertManager mport -incert cert_file -inkey privkey_file
Delete
The command below deletes the digital identity with the given index in the container:
UCertManager delete -entry index
Export
The command below exports the digital identity with the given index in the container into a PKCS#12 file:
UCertManager export -entry index -out out_file
Engine Settings
This section provides information with regards to various setting configurations available for the EngageCX Develop product.
For in-depth details, please select a topic from below:
| Compatibility API Configuration | HTTP Server |
| PDF Compliance Settings | Private Fonts |
| Backwards Compatibility | DTD Whitelist |
Compatibility API Configuration
The EngageCX Develop solution is backward-compatible with the old TCP API version. If you are still using the EngageCX.Ultrascale client and have a distributed deployment of the engines, you might need to use the properties below:
| IP Address | Port Number | Backlog |
Editing the IP Address
Follow these instructions to change the IP Address that server will use to listen for incoming requests.
You can use 127.0.0.1 to restrict access only to the current computer (loopback), 0.0.0.0 to listen all network adapter, or set up a specific IP Address.
From Management Console
- In Management Console, navigate to Server Manager > Configuration > EngageCX Develop Engine > Engine Settings > Compatibility API Configuration.
- Double-click on the
IP Addressproperty, then enter the IP Address of the worker server.
From Configuration File
Open the configuration file (e.g.: PublisherSvc.config in Windows, or UDaemon.config in Linux), then add the parameter below:
ServerAddress=127.0.0.1
Editing the Port Number
Follow the instructions below to specify the TCP port used to listen for incoming requests. The Port value must be between 1000 and 65535. The default value is 1099.
From Management Console
- In Management Console, navigate to Server Manager > Configuration > EngageCX Develop Engine > Engine Settings > Compatibility API Configuration.
- Double-click on the
Portproperty, then enter the port number you want to use.
From Configuration File
Open the configuration file (e.g.: PublisherSvc.config in Windows, or UDaemon.config in Linux), then add the parameter below:
ServerPort=1099
Editing the Backlog
Follow these instructions to set up the maximum number of outstanding connection requests. The default value is: 500
From Management Console
- In Management Console, navigate to Server Manager > Configuration > EngageCX Develop Engine > Engine Settings > Compatibility API Configuration.
- Double-click on the
Backlogproperty, then enter the value you want to configure.
From Configuration File
Open the configuration file (e.g.: PublisherSvc.config in Windows, or UDaemon.config in Linux), then add the parameter below:
ServerBacklog=500
DTD Whitelist
XSL transformations can be used to access unwanted resources from the server machines (via HTTP request or file request). XF Rendering Server allows system administrators to configure a DTD whitelist containing only trusted resources that can be accessed via XSL transformations. If an XSL template contains URIs that are not contained in the DTD Whitelist, at rendering time, these resources will not be used and an error will be thrown.
HTTP Server
EngageCX Develop allows you to make HTTP requests using JSON or XML content through the REST API. The new HTTP API is designed to work using REST API requests and not the old .NET, JAVA, CCP clients. REST API requests should be made with available specific language objects (e.g. in .NET we have the WebRequest class). To learn more about the REST API requests, the page can be accessed by following this link:
http://ecrionserver:portnumber/doc/
where ecrionserver is the server on which you installed the EngageCX Develop product, and portnumber is the TCP port used to listen HTTP incoming requests.
HTTP Configurations
You can configure the HTTP server through the Management Console, or by adding the corresponding parameters in the configuration file (e.g. on Linux environments). This section explains the HTTP server configurations available in EngageCX Develop.
| Enable HTTP Server | HTTP Server Port | HTTP Server Thread Pool |
| Enable HTTPS Server | HTTPS Server Port | HTTPS Server Thread Pool |
| HTTPS Certificate | API KEY |
Note
Any changes made to the configuration file requires a restart of the service.
Enable HTTP Server
Follow these instructions to enable/disable the HTTP Server listener, including the REST API page requests.
From Management Console
- In Management Console, navigate to Server Manager > Configuration > EngageCX Develop Engine > Engine Settings > HTTP Server Configuration.
- Double-click on the
Enable HTTP Serverproperty, then check the needed option in the Edit Property dialog.
From Configuration File
Open the configuration file (e.g.: PublisherSvc.config in Windows, or UDaemon.config in Linux), then add the parameter below and provide the needed value:
HTTPEnabled=True | False
HTTP Server Port
Follow the instructions below to set up the HTTP port used to listen for incoming requests.
Available value: must be somewhere between 1000 and 65535
Default value: 50100
From Management Console
- In Management Console, navigate to Server Manager > Configuration > EngageCX Develop Engine > Engine Settings > HTTP Server Configuration.
- Double-click on the
HTTP Server Portproperty, then enter the port number into the textbox.
From Configuration File
Open the configuration file (e.g.: PublisherSvc.config in Windows, or UDaemon.config in Linux), then add the parameter below and provide the needed value
HTTPPort=50000
HTTP Server Thread Pool
Follow the instructions below to configure the maximum number of threads used for the HTTP Server thread pool.
Default value: 10
From Management Console
- In Management Console, navigate to Server Manager > Configuration > EngageCX Develop Engine > Engine Settings > HTTP Server Configuration.
- Double-click on the
HTTP Server Thread Poolproperty, then enter the value you want to apply in textbox.
From Configuration File
Open the configuration file (e.g.: PublisherSvc.config in Windows, or UDaemon.config in Linux), then add the parameter below and provide the needed value
HTTPConnectionPool=10
Enable HTTPS Server
Follow the instructions below to enable/disable the HTTPS Server listener.
From Management Console
- In Management Console, navigate to Server Manager > Configuration > EngageCX Develop Engine > Engine Settings > HTTP Server Configuration.
- Double-click on the
Enable HTTPS Serverproperty, then choose to enable or disable secure HTTP.
From Configuration File
Open the configuration file (e.g.: PublisherSvc.config in Windows, or UDaemon.config in Linux), then add the parameter below and provide the needed value:
HTTPSEnabled=True | False
HTTPS Server Port
Follow the instructions below to configure the HTTPS port used to listen for incoming requests.
Available value: must be somewhere between 1000 and 65535
Default value: 50101
From Management Console
- In Management Console, navigate to Server Manager > Configuration > EngageCX Develop Engine > Engine Settings > HTTP Server Configuration.
- Double-click on the
HTTPS Server Portproperty, then choose to enable or disable secure HTTP.
From Configuration File
Open the configuration file (e.g.: PublisherSvc.config in Windows, or UDaemon.config in Linux), then add the parameter below and provide the needed value:
HTTPSPort=50101
HTTPS Server Thread Pool
Follow the instructions below to set up the maximum number of threads to use for the HTTPS Server thread pool.
From Management Console
- In Management Console, navigate to Server Manager > Configuration > EngageCX Develop Engine > Engine Settings > HTTP Server Configuration.
- Double-click on the
HTTPS Server Thread Poolproperty, then enter the value you want to apply in textbox.
From Configuration File
Open the configuration file (e.g.: PublisherSvc.config in Windows, or UDaemon.config in Linux), then add the parameter below and provide the needed value:
HTTPSConnectionPool=10
HTTPS Certificate
To set up a SSL certificate for EngageCX Develop, after installing the certificate in Server Certificates, you will have to configure its name si password within the HTTP Server section. Here's how:
From Management Console
- Open Management Console and go to Server Manager > Configuration > EngageCX Develop Engine > Server Certificates.
- Double-click on the newly installed certificate, then copy the value from the
Serial Numberfield. - Next, navigate to Server Manager > Configuration > EngageCX Develop Engine > Engine Settings > HTTP Server Configuration.
- Double-click on the
HTTPS Certificateproperty, then copy the serial number copied. - Then, open the
HTTPS Certificate Passwordproperty, then enter your HTTP Certificate Password in the empty box. Note that Management Console will automatically encrypt your password.
From Configuration File
Open the configuration file (e.g.: PublisherSvc.config in Windows, or UDaemon.config in Linux), then add the parameters below with the needed values:
HTTPSCertificate={HTTPS Certificate Serial Number}
HTTPSCertificatePassword={HTTPS Certificate Encrypted Password}
API Key
To be able to make API requests within the REST API page or directly through your application, you will need an API Key. Here's how you can configure an API Key for EngageCX Develop:
From Management Console
- Open Management Console and go to Server Manager > Configuration > EngageCX Develop Engine > Engine Settings > HTTP Server Configuration > API Key.
- Double-click on the
API Keyproperty and enter an unique string you want to use as an API Key. - Note that when you are adding the API key into REST API Access Token or in your application, use the following format:
API:GUID. For example, API:0ae4af41-b530-4038-be82-a0fa8b3f1d55.
From Configuration File
Open the configuration file (e.g.: PublisherSvc.config in Windows, or UDaemon.config in Linux), then add the parameter below with the needed values:
Authorization=GUID
Private Fonts
EngageCX Develop can automatically recognize all fonts installed on the system. In addition to the default Windows fonts, EngageCX Develop will also recognize the five standard Adobe fonts: Courier, Helvetica, Times, Symbol and ZapfDingBats. This section offers information on how to make additional fonts available to EngageCX Develop without installing them on Windows, thus making them private to the server.
Adding and Editing Private Fonts
Follow the steps below to configure a font as private font:
- Open
Management Console. - Navigate to
Server Manager > Configuration > Engine Settings > Private Fonts. - Select the
Addbutton in the right-side. - In the Edit Private Fonts, select
Browseto search for the file's location path. The supported file formats are: .afm, .pfm, .ttf, .otf. - Provide a name for your font file. Additionally, you can specify if the font is bold or italic by selecting the corresponding checkboxes.
- Enable the
Restart the service to apply changesoption in order for the changes made to take effect. The restart of the service can be done also manually after adding the font file(s).
Note
Usually, the user must install 4 font files as private, illustrating all the available variants for each font family: regular, bold, italic and bold italic.
Make sure you are using the same font family name in your template, as specified in the Private Font.
PDF Compliance Settings
To generate a fully compatible ADA output, it must be necessary to set up the parameters below in your main configuration file (PublisherSvc.config). Note that a restart of the EngageCX Develop service is required to apply the changes.
| PDF508IgnoreStaticContent | EnablePDF508StandardFonts | PDF508AdditionalFonts |
Ignore Static Content
When this parameter is enabled, the elements from the template static contents, such as Header (RegionBefore), Footer(RegionAfter), Left (RegionStart) and Right(RegionEnd) sides will be ignored. By default, the parameter is disabled.
Usage Example:
PDF508IgnoreStaticContent=True|False
Enable Standard Fonts
When this parameter is enabled, you can use the Adobe Standard fonts (e.g. Helvetica, Times, etc.) without embedding it in the PDF output. By default, the parameter is disabled.
Usage Example:
EnablePDF508StandardFonts=True|False
Configure Additional Fonts
This parameter enables the use of the specified fonts for PDF 508 without embedding them in PDF.
Usage Example:
PDF508AdditionalFonts=<fontName>
Backwards Compatibility
This view from the Management Console allows configuration of default behaviors that have been changed in the latest version of Develop Engine from previous versions. To be able to change some of the default values already set, you should access the Management Console:
- Open the Management Console and go to Server Manager > Configuration > EngageCX Develop Engine > Engine Settings > Backwards Compatible.
- Double-click on the needed property to change its default value.
For in-depth details, please select a property from the table below:
Default measurement unit
Use this property to set a default measurement unit to be used when it is not specified.
Available values: Percent or Points
- In Management Console, navigate to Engine Settings > Backwards Compatibility and double-click on the
Default measurement unitproperty to set up the needed value. - In Configuration File (e.g.: PublisherSvc.config in Windows, or UDaemon.config in Linux), use the parameter from below:
MeasurementUnit=Percent|Points
Behavior for 'bottom' and 'right' attributes
Use this property to interpret 'right' and 'bottom' attribute values as being relative to left and top edges of the parent area respectively.
Available values: True or False
- In Management Console, navigate to Engine Settings > Backwards Compatibility and double-click on the
Behavior for 'bottom' and 'right' attributesproperty to set up the needed value. - In Configuration File (e.g.: PublisherSvc.config in Windows, or UDaemon.config in Linux), use the parameter from below:
ComputeSizeFromMargins=True|False
Treat margin as spacing
By default, margins add a spacing conditionality of 'retain'. Enable this option to suppress this behavior.
Available values: True or False
- In Management Console, navigate to Engine Settings > Backwards Compatibility and double-click on the
Treat margin as spacingproperty to set up the needed value. - In Configuration File (e.g.: PublisherSvc.config in Windows, or UDaemon.config in Linux), use the parameter from below:
TreatMarginAsSpacing=True|False
Allow justification with linefeed "preserve"
When linefeed-treatment is set to "preserve" for a certain paragraph, text justification is not allowed by default.
Available values: True or False
- In Management Console, navigate to Engine Settings > Backwards Compatibility and double-click on the
Allow justification with linefeed "preserve"property to set up the needed value. - In Configuration File (e.g.: PublisherSvc.config in Windows, or UDaemon.config in Linux), use the parameter from below:
AllowJustificationWithLinefeedPreserve=True|False
Allow fixed layout tables in WordML output
Use this property to make all tables in WordML have automatic layout. This is safe to enable when lists in WordML aren't set to be converted to tables.
Available values: True or False
- In Management Console, navigate to Engine Settings > Backwards Compatibility and double-click on the
Allow fixed layout tables in WordML outputproperty to set up the needed value. - In Configuration File (e.g.: PublisherSvc.config in Windows, or UDaemon.config in Linux), use the parameter from below:
AllowFixedTablesInWordMLOutput=True|False
Convert lists to tables in WordML output
Use this property to render lists as WordML tables to better map the XSL-FO model. Tables and other complex elements are permitted to show up inside the label or body.
Available values: True or False
- In Management Console, navigate to Engine Settings > Backwards Compatibility and double-click on the
Convert lists to tables in WordML outputproperty to set up the needed value. - In Configuration File (e.g.: PublisherSvc.config in Windows, or UDaemon.config in Linux), use the parameter from below:
ConvertListsToTablesInWordMLOutput=True|False
Set the default font
Use this property to set the font to be used when no other font is specified.
Available values: font_value (e.g. Times)
- In Management Console, navigate to Engine Settings > Backwards Compatibility and double-click on the
Set the default fontproperty to set up the needed value. - In Configuration File (e.g.: PublisherSvc.config in Windows, or UDaemon.config in Linux), use the parameter from below:
DefaultFontFamily=Times|Symbol|Courier|Helvetica|Zapfdingbats
Set the default font size (in points)
Use this property to set the font size (in points) to be used when no other font size is specified.
Available values: font_size (e.g. 10)
- In Management Console, navigate to Engine Settings > Backwards Compatibility and double-click on the
Set the default font size (in points)property to set up the needed value. - In Configuration File (e.g.: PublisherSvc.config in Windows, or UDaemon.config in Linux), use the parameter from below:
DefaultFontSize=10
Layout empty tables
Use this property to make the content of the header/footer to appear regarding the fact that no content is specified in the table body.
Available values: True or False
- In Management Console, navigate to Engine Settings > Backwards Compatibility and double-click on the
Layout empty tablesproperty to set up the needed value. - In Configuration File (e.g.: PublisherSvc.config in Windows, or UDaemon.config in Linux), use the parameter from below:
LayoutEmptyTables=True|False
Consume inline blocks
Use this property to allows inlines with block content only, to affect the line height.
Available values: True or False
- In Management Console, navigate to Engine Settings > Backwards Compatibility and double-click on the
Consume inline blocksproperty to set up the needed value. - In Configuration File (e.g.: PublisherSvc.config in Windows, or UDaemon.config in Linux), use the parameter from below:
ConsumeInlineBlocks=True|False
Update WordML TOC
Use this property to automatically update WordML input table of contents.
Available values: True or False
- In Management Console, navigate to Engine Settings > Backwards Compatibility and double-click on the
Update WordML TOCproperty to set up the needed value. - In Configuration File (e.g.: PublisherSvc.config in Windows, or UDaemon.config in Linux), use the parameter from below:
ExpandTOCInWordInput=True|False
Rasterize cropped images in WordML input
Use this property for cropped images in WordML input format to be rasterized, rather than clipped. Recommended for AFP output format.
Available values: True or False
- In Management Console, navigate to Engine Settings > Backwards Compatibility and double-click on the
Rasterize cropped images in WordML inputproperty to set up the needed value. - In Configuration File (e.g.: PublisherSvc.config in Windows, or UDaemon.config in Linux), use the parameter from below:
RasterizeCroppedImages=True|False
Ignore table height
Use this property to ignore the height attribute defined on <fo:table> element.
Available values: True or False
- In Management Console, navigate to Engine Settings > Backwards Compatibility and double-click on the
Ignore table heightproperty to set up the needed value. - In Configuration File (e.g.: PublisherSvc.config in Windows, or UDaemon.config in Linux), use the parameter from below:
IgnoreTableHeight=True|False
Ignore Space Before After Span All
Use this property to ignore <fo:element> space-before after span="all".
Available values: True or False
- In Management Console, navigate to Engine Settings > Backwards Compatibility and double-click on the
Ignore Space Before After Span Allproperty to set up the needed value. - In Configuration File (e.g.: PublisherSvc.config in Windows, or UDaemon.config in Linux), use the parameter from below:
IgnoreSpaceBeforeAfterSpan=True|False
Use layout auto
Use this property to use layout auto for fixed table when the columns definition are missing.
Available values: True or False
- In Management Console, navigate to Engine Settings > Backwards Compatibility and double-click on the
Use layout autoproperty to set up the needed value. - In Configuration File (e.g.: PublisherSvc.config in Windows, or UDaemon.config in Linux), use the parameter from below:
EnableTableLaoutAutoWhenColumnsMissing=True|False
Use default accessibility values
Use this property if no accessibility values are found to generate appropriate default values by the server.
Available values: True or False
- In Management Console, navigate to Engine Settings > Backwards Compatibility and double-click on the
Use default accessibility valuesproperty to set up the needed value. - In Configuration File (e.g.: PublisherSvc.config in Windows, or UDaemon.config in Linux), use the parameter from below:
PDFA1aAccessibleUseDefaultValues=True|False
Merge PDF Fonts
Use this parameter to reduce size of the output when merging PDF inputs.
Available values: True or False
- In Management Console, navigate to Engine Settings > Backwards Compatibility and double-click on the
Merge PDF Fontsproperty to set up the needed value. - In Configuration File (e.g.: PublisherSvc.config in Windows, or UDaemon.config in Linux), use the parameter from below:
PDFMergeFonts=True|False
Sort XML Attributes
Use this parameter to enable XML attributes sorting in order of priority. For example, in XSL-FO 'border-left-style' has higher priority than 'border' attribute.
Available values: True or False
- In Management Console, navigate to Engine Settings > Backwards Compatibility and double-click on the
Sort XML Attributesproperty to set up the needed value. - In Configuration File (e.g.: PublisherSvc.config in Windows, or UDaemon.config in Linux), use the parameter from below:
XMLSortAttributes=True|False
PDF Input Fast Pattern Fill
Use this parameter for PDF input to turn on the optimized pattern fill algorithm. Please note, some pattern fills may not work correctly.
Available values: True or False
- In Management Console, navigate to Engine Settings > Backwards Compatibility and double-click on the
PDF Input Fast Pattern Fillproperty to set up the needed value. - In Configuration File (e.g.: PublisherSvc.config in Windows, or UDaemon.config in Linux), use the parameter from below:
PDFFastPatternFill=True|False
Use tables for lists in HTML Output
Use this parameter to enable the conversion of lists to tables in HTML Output.
Available values: True or False
- In Management Console, navigate to Engine Settings > Backwards Compatibility and double-click on the
Use tables for lists in HTML Outputproperty to set up the needed value. - In Configuration File (e.g.: PublisherSvc.config in Windows, or UDaemon.config in Linux), use the parameter from below:
CONVERT_LIST_TO_TABLES=True|False
Enable Unsafe DTD
Use this property to enable DTD for unsafe XSLT engines. Warning, this may potentially make the XSLT engines vulnerable to XML External Entity (XXE) processing.
Available values: True or False
- In Management Console, navigate to Engine Settings > Backwards Compatibility and double-click on the
Enable Unsafe DTDproperty to set up the needed value. - In Configuration File (e.g.: PublisherSvc.config in Windows, or UDaemon.config in Linux), use the parameter from below:
EnableUnsafeDTD=True|False
Log warnings for map element in Word Input
Use this parameter to enable logging for Word Input elements that are unrecognized and skipped during rendering.
Available values: True or False
- In Management Console, navigate to Engine Settings > Backwards Compatibility and double-click on the
Log warnings for map element in Word Inputproperty to set up the needed value. - In Configuration File (e.g.: PublisherSvc.config in Windows, or UDaemon.config in Linux), use the parameter from below:
LogWarningsForMapElementInWordInput=True|False
Generate empty cells for columns in HTML Output
Use this parameter to generate empty cells with specified width for correct HTML output in Outlook 2007.
Available values: True or False
- In Management Console, navigate to Engine Settings > Backwards Compatibility and double-click on the
Generate empty cells for columns in HTML Outputproperty to set up the needed value. - In Configuration File (e.g.: PublisherSvc.config in Windows, or UDaemon.config in Linux), use the parameter from below:
GenerateEmptyCellsForHTMLOutput=True|False
Generate automatic numbering lists from Word Input
Use this parameter to generate automatic numbering lists when input is Word.
Available values: True or False
- In Management Console, navigate to Engine Settings > Backwards Compatibility and double-click on the
Generate automatic numbering lists from Word Inputproperty to set up the needed value. - In Configuration File (e.g.: PublisherSvc.config in Windows, or UDaemon.config in Linux), use the parameter from below:
GenerateAutoNumberingListsInWordInput=True|False
Auto page orientation
Use this parameter to compute page orientation for direct printing based on width and height.
Available values: True or False
- In Management Console, navigate to Engine Settings > Backwards Compatibility and double-click on the
Auto page orientationproperty to set up the needed value. - In Configuration File (e.g.: PublisherSvc.config in Windows, or UDaemon.config in Linux), use the parameter from below:
AutoPageOrientationPrinting=True|False
Use internal library to rasterize text
Use this parameter to rasterize text using GDIPlus or an internal library.
Available values: True or False
- In Management Console, navigate to Engine Settings > Backwards Compatibility and double-click on the
Use internal library to rasterize textproperty to set up the needed value. - In Configuration File (e.g.: PublisherSvc.config in Windows, or UDaemon.config in Linux), use the parameter from below:
DrawTTFWithFreetype=True|False
Omit table row height for HTML output
Use this parameter to omit the table row height for HTML output.
Available values: True or False
- In Management Console, navigate to Engine Settings > Backwards Compatibility and double-click on the
Omit table row height for HTML outputproperty to set up the needed value. - In Configuration File (e.g.: PublisherSvc.config in Windows, or UDaemon.config in Linux), use the parameter from below:
OmitTableHeightForHTMLOutput=True|False
Preserve white-space
Use this parameter to preserve white-space in template.
Available values: Auto, No or Yes
- In Management Console, navigate to Engine Settings > Backwards Compatibility and double-click on the
Preserve white-spaceproperty to set up the needed value. - In Configuration File (e.g.: PublisherSvc.config in Windows, or UDaemon.config in Linux), use the parameter from below:
PreserveWhiteSpace=True|False
Preserve JPEG images
Use this parameter to preserve original JPEG images in PDF output.
Available values: True or False
- In Management Console, navigate to Engine Settings > Backwards Compatibility and double-click on the
Preserve JPEG imagesproperty to set up the needed value. - In Configuration File (e.g.: PublisherSvc.config in Windows, or UDaemon.config in Linux), use the parameter from below:
PreserveJPEGImages=True|False
Automation
EngageCX Develop can monitor one or more folders and automatically process the documents arriving into those folders.
There are no restrictions regarding the number of folders being watched.
The folders can be monitored in the Automation section under Hot Folders.
Adding Hot Folders
Hot Folders permit the user to run the EngageCX services in an automated fashion, simplifying the addition and rendering process of files and folders.
- In the Automation section, click on the
Add Folderbutton. - Next, select the
EngageCX Develop Engineas processor type. - Next, configure the hot folder in the Hot Folder Properties dialog as needed. The Input, Destination and File Pattern fields are mandatory. In order for the changes to take effect, the server must be restarted. This can be done manually or automatically by selecting the
Restart the service to apply changesoption after modifying a value.
The following sections are available:
| Input and Output | Apply Template | |
| Advanced Settings | Postprocessing |
Input and Output
The Input and Output section contains options regarding the main attributes that must be specified:
- Input - specifies the path where the input files are located. The user can type in the path or navigate to it on the local machine, using the
Browsebutton. - File Pattern - represents the input file's format. The file formats are the same as the ones supported by EngageCX Develop.
- Monitoring is enabled for this folder - when this option is selected, the input folder will be permanently monitored and the files will be rendered automatically when changes occur or the rendering server is restarted.
- Destination - specifies the path where the output files are stored. The user can type in the path or navigate to it on the local machine, using the
Browsebutton. - Output Format - specifies the output file's format. The available formats are PDF, Postscript, AFP, WordML, XPS, TIFF, HTML, JPEG, GIF, PNG, PPTX, EPUB, IOCA, TXT, DOCX, DICOM.
Hot Folders permit the user to automatically print the output files after they are rendered.
The available printers are automatically detected by EngageCX Develop and can be selected from the Output Printer drop-down menu.
Apply Template
When the input file format is .xml, a template file must be defined.
Hot Folders permit the user to set a server template that will be used when rendering the .xml files.
If a server template is used, different options can be set such as:
- XSLT Engine - the engine can be set up when you define the workspace that contains the selected server template.
- Split XPath - the server will render a document for each occurrence of the selected node. For example, if 14 cd nodes exist in the XML Tree, 14 separate documents will be generated, each containing data from a particular cd node, according to the template.
- Language ID - a template file can have assigned multiple translations, depending on the user's preferences. When rendering to the desired output format, one of these files can be applied using its ID.
- XSLT Parameters - The user can assign new values to XSLT parameters defined in the template.
- Preserve Whitespace - this property helps you handle the whitespace from the XML file. When the property is enabled, the white spaces included in your XML file will not be deleted during the rendering time and will be visible in the output generated.
Advanced Settings
The Settings section allows the user to set different parameters, depending on the output file format.
When the Settings button is selected, a dialog with all the available option will be displayed and the user can set, for example, PDF restrictions, image output resolution, encoding, printer settings etc.
Postprocessing
The Postprocessing section allows the user to define certain actions when the input file's rendering has been successful or has failed.
The actions available for both scenarios are the same and must be defined by the user. If no action is defined, by default no modification will be done to the files.
When the Edit button is selected, the Actions dialog will be displayed, allowing the user to Add, Remove, Edit, Move Up or Move Down the actions.
If the Add or Edit buttons are selected, the Edit Action dialog will be displayed, allowing to define the actions that will take place if the file succeeded or failed rendering.
Different actions can be defined and the input files can be deleted, moved etc.
Command Line Tools
This section covers the details on how to use the various tools that comes with your EngageCX Develop solution.
Render Tools
EngageCX Develop provides command line tools that can be used for high-speed rendering of different input file formats to the desired output. The Render executive is a native socket-based client for EngageCX Develop that sends out a rendering request to the Publishing engine, locally or remotely. The Render tools use a unified command line that is presented below: It is also available on all supported platforms.
Rendering Parameters
The RenderingParameters object encapsulates all customizable parameters that can override the settings specified in the Management Console.
PDF Output
| Name | Description | Value |
|---|---|---|
| pdfownerpassword | The owner password for encrypted PDF output. | String |
| pdfuserpassword | The password for encrypted PDF output. | String |
| pdfencryptionstrength | Password encryption strength for encrypted PDF output. Valid values are 128 and 40. Default is 40. | Int |
| pdfpermissions | Specifies permission options for generating encrypted PDF output. Default value is 0. | ALLOWPRINTINGALLOWMODIFYCONTENTSALLOWCOPYALLOWMODIFYANNOTATIONSALLOWFILLINALLOWSCREENREADERSALLOWASSEMBLYALLOWDEGRADEDPRINTING |
| pdfversion | Specifies options for generating PDF output version. | PDF1.4 PDF1.5 PDF1.6 PDF1.7 |
| pdfconformance | Specifies options for generating PDF output. | NotSetPDF_XPDFA_1APDFA_1A_AccessiblePDFA_1BPDF508 |
| pdfimagecompression | Sets the type of image compression used by the PDF renderer. | jpegflat |
AFP Output
| Name | Description | Value |
|---|---|---|
| afpconverttograyscale | Specifies options for generating AFP output. Default value is 0. | disabledrgbpatternhighlight |
| afpfonts | Specifies the usage of either AFP Outline, AFP Raster or True Type fonts. | afprasterafpoutlineafpconverttorasterafpconverttooutline |
| afpautorotatelandscapepages | Automatically rotates landscape pages with 90 degrees clockwise. | boolean |
| afpwritesentinels | Writes 0x5A sentinels between AFP records. | boolean |
| afpimagecompression | Modifies the image's size in the output document at the cost of image clarity. NONE means no compression an offers the best clarity. | nonejpegibmmmrg4mmr |
| afpcodepage | Resources that associate code points with character identifiers within a font character set, each representing a character pattern. A code point is an 8-bit binary number representing one of 256 potential characters. | T1001252T1000892T1V10500T1000808T1001250CUSTOM |
Text Output
| Name | Description | Value |
|---|---|---|
| textoutputencoding | Specifies the txt output encoding. | asciiutf16utf8 |
| textoutputfontfamily | Specifies font family used for layout text in the output. | float |
| textoutputfontsize | Specifies the font size used for layout text in the output. | float |
| textoutputlineheight | Specifies the line height used for layout text in the output. | float |
| textoutputformfeed | Specifies if form feed character will be used for delimiting pages. | boolean |
| textoutputtrimpages | When the value is set to "true", the server will calculate how many pages will be printed, taking into account the font size, line height and page size. | boolean |
| textoutputignorecssboxattributes | Specifies if CSS box attributes will be used or ignored. | boolean |
Html Input
| Name | Description | Value |
|---|---|---|
| htmlinputencoding | Specifies the HTML input encoding.Important: If the HTML input file has 'charset' value specified , the engine will ignore input encoding and will use encoding extracted from file. | utf8win1252 |
| htmlpagewidth | Sets the width of the page when converting from HTML to a paginated format. | String |
| htmlpageheight | Sets the height of the page when converting from HTML to a paginated format. | String |
| htmlpagemargintop | Sets the top margin of the page when converting from HTML to a paginated format. | String |
| htmlpagemarginleft | Sets the left margin of the page when converting from HTML to a paginated format. | String |
| htmlpagemarginright | Sets the right margin of the page when converting from HTML to a paginated format. | String |
| htmlpagemarginbottom | Sets the bottom margin of the page when converting from HTML to a paginated format. | String |
| htmlpageheadermargin | Sets the header extent of the page when converting from HTML to a paginated format. | String |
| htmlpagefootermargin | Sets the footer extent of the page when converting from HTML to a paginated format. | String |
| htmlshowpagenumber | Specifies whether to show page numbers when converting from HTML to a paginated format. | boolean |
| htmlshowtitle | Specifies whether to show the title when converting from HTML to a paginated format. | boolean |
Html Output
| Name | Description | Value |
|---|---|---|
| htmlusefixedbodywidth | Specifies to the HTML output engine whether to preserve the width of the original XSL-FO page body or not. | boolean |
| htmlfixedbodyalign | Specifies the body align. | String |
| htmlgeneratehtmldocument | Specifies to the HTML output engine whether to generate a HTML document or not. | boolean |
| htmlhidestaticcontent | Specifies if the static content will be displayed or not in the HTML output. | boolean |
| renderedimagesbaseurl | Specifies the rendered image's url. | String |
| renderedimagesoutputfolder | Specifies the output folder for the rendered images. | String |
Image Output
| Name | Description | Value |
|---|---|---|
| imagepageindex | Represents the page index to render. Meaningful only for JPEG / GIF / PNG / SVG output file formats. | Int |
| zoom | Sets the image output's zoom. | Int |
| encodercompressiontype | Sets the compression type used by the encoder. | noneccitt3ccitt4lzwrle |
| resolution | Sets both the X and Y resolution. | Int |
| smoothingmode | Specifies the type of smoothing (antialiasing) that is applied to images. | defaultnoneantialias |
| imagetransparentbackground | Specifies if the image output has transparent background. | boolean |
| imagescalewidth | Sets the image output's width. | Int |
| imagescaleheight | Sets the image output's height. | Int |
Misc
| Name | Description | Value |
|---|---|---|
| preloaddocument | Preloads the document before rendering. When it is enabled, the whole document will be loaded in memory and the XSL-FO engine will be more permissive with content placement. | boolean |
| languageid | Represents the translation id. It is available only for XFD templates that have at least one translation. | String |
| preservewhitespace | Specifies the default white space handling. | boolean |
| referenceresolvertype | Sets the type of resolver thread. | paralleldisabledserialoptimized |
| imageerrors | Sets the image errors handling mode. | throwignoreusestock |
| fonterrors | Sets the font errors handling mode. | throwusedefault |
| performlayout | Specifies if the server should perform layout on input documents before rendering to the desired output. It is available only for WordML and HTML output formats. | boolean |
| baseurl | Specifies the base url. | String |
| merge | Specifies if the documents are rendered in a merge context. All the input files will be rendered in one document. It is available only for PDF and PostScript output file formats. | boolean |
Printer Settings
| Name | Description | Value |
|---|---|---|
| printername | Specifies the printer name and it applies only when direct printing is used. | String |
| outputprintfile | Specifies the name of a PCL output file. | String |
| printjobname | Specifies the print job name displayed in the Print Manager when printing a document. | String |
| inputtray | Specifies the input tray from which the printer selects the paper source. | String |
| outputtray | Specifies the printer output tray. | String |
| copycount | Specifies the copy count for a page to be multiplied when printing. | Int |
| printingmode | Specifies the mode of printing. | autosimplexduplex |
| colormode | Specifies the mode of color printing. | autocolormonochrome |
| orientation | Specifies the orientation of printed documents. | autoportraitlandscape |
| manualTray | Specifies the usage of the manual printer tray. It is applied for Postscript output. | boolean |
XSLT Template
| Name | Description | Value |
|---|---|---|
| xsltparameters | Pairs of name and values that must be passed to the XSL transformation. | ("param1","value1")("param2","value2") |
| xsltengine | Sets the XSL transformation engine to use for a local transformation. | MSXMLDOTNET20SAXON |
| servertemplateid | When specified, it will cause the engine to run a server transformation. The input data must be XML. | String |
| template | When specified, it will cause the engine to run a local transformation. The input data must be XML. Equivalent with specifying -xsl |
String |
| username | Specifies the username for the rendering process. | String |
| password | Specifies the password for the associated username. | String |
DAS
| Name | Description | Value |
|---|---|---|
| dasserverdiagramid | When specified, it will cause the engine to run a server transformation. | String |
| dasaddress | Specifies the IP Address on which the server will run the command. | IPAddress |
| dasport | Specifies the port of the Data Aggregation Server. | Int |
BI Server
| Name | Description | Value |
|---|---|---|
| biserverurl | Specifies the BI server URL. | String |
| biservertoken | Specifies the token that enables the BI server URL. | String |
ULoad.NET
ULoad.NET is a tool for EngageCX Develop that can be utilized to measure the system's performance under heavy load.
- Usage Command
ULoad.NET load_test_file [-r remote_server] [-p port number] [-t no_threads]
- Example of usage of a load test job file for ULoad.NET
"C:\Test1.fo" "C:\Test1.pdf"
"C:\Test2.fo" "C:\Test2.pdf"
"C:\Test3.fo" "C:\Test3.pdf"
Troubleshooting
This section help you identify common problems and includes reference to resources from where you can get more information.
Logging
Enable Logging
From Management Console
- In Management Console, navigate to Server Manager > Configuration > EngageCX Develop Engine > Engine Settings > Logging.
- Double-click on the
Log Levelproperty to change its value. You can choose from the following values:None- No logging will occur;Normal- Errors, warnings and information messages will be logged;All- Errors, warning, information messages and diagnostic traces will be logged;Debug- Everything will be logged, including diagnostic information for troubleshooting.
- To log the stack trace whenever an exception is thrown, set the
Dump Stack Trace On ErrortoTrue.
Note
By default, the property should be set to false; it must be turned on for troubleshooting, only when instructed by Technical Support Team.
- To write errors and warnings in your log file, a restart of the EngageCX Develop Engine service from Task Manager is recommended.
Access the Log File
- By default, the log file is stored in C:\ProgramData\EngageCX\Log.
- In case you want to change the default log file, you have to access the Management Console.
- Navigate to Server Manager > Configuration > EngageCX Develop Engine > Engine Settings > Logging.
- Double-click on the
Log Folderparameter to add a new path.
- Double-click on
Log Filesto open the Log folder. - Within this log folder, search for PublisherSvc*.log file.
- Open it using a text editor.
From Configuration File
Open the configuration file (e.g.: PublisherSvc.config in Windows or UDaemon.config in Linux), then add the parameter below and provide the needed value:
LogLevel=None | Normal | All | Debug |
Diagnostics
This section displays messages and other feedback from the installed services. It delivers warnings, diagnostics, information and errors about the EngageCX Rendering Server. In order to display these diagnostics messages, some of the corresponding checkboxes located in the right panel must be selected.