NorthStar Designer
Overview
NorthStar Designer is an online template creation tool available through NorthStar CCM. It allows you to create styled PDF templates that render dynamically based on linked data.
The features of the NorthStar Designer editor are spread across multiple tabs:
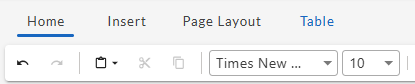
- Home: Style and format the text in the document. Also, select a data source for the dynamic elements of the template, set criteria for conditional formatting, and preview the template as a word doc or web page.
- Insert: Insert images, tables, fields, content fragments, or conditional text into the document. Also add page numbers and date & time.
- Page Layout: Adjust page margins, document orientation (portrait or landscape), and select the paper size for printing (Letter, A3, etc.).
- Table: Format tables and create repeating rows to display varying data elements.
- Document Information: The document information element allows you to view and modify the document metadata, including Title, Author, Subject, Keywords, and Reading Language.
This guide will walk you through:
- Creating or opening a template in NorthStar Designer
- Adding and formatting static content (such as text, images, and metadata)
- Adding and editing dynamic elements (such as data fields, conditional text, and repeating rows)
- Saving and Previewing your Document
Opening or Creating a Template
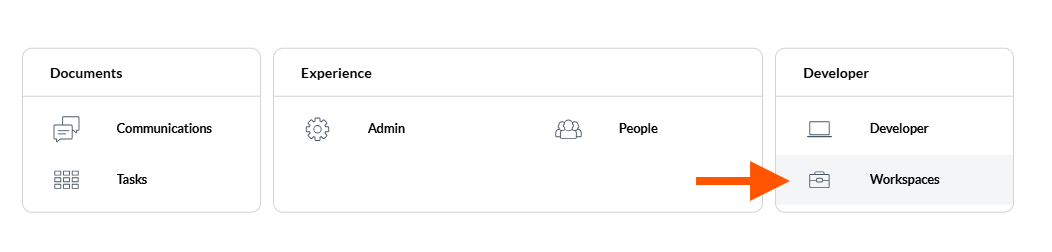
All your templates can be found in folders in the Workspaces area of NorthStar CCM. Any templates that are associated with a project can also be found in the Projects area.
You can create a new template from either location.
Opening a Template in a Workspace
-
From the homepage, click on Workspaces.
-
Select the Workspace containing your template folder, or where you’d like to create a new template.
-
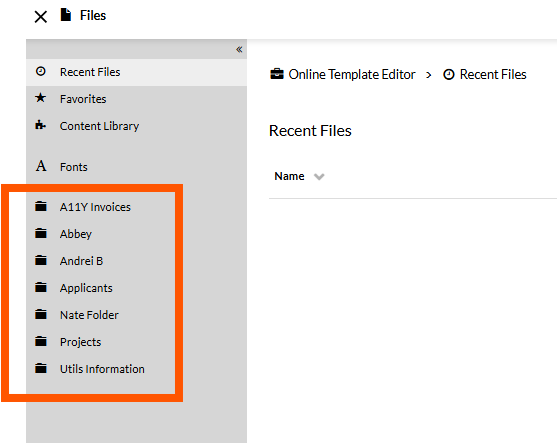
Select a folder from the left panel. Alternatively, you can create a new folder by clicking + New Folder in the upper right corner.
-
Within the folder, click on the template you’d like to open.
-
To create a new template, click “New” in the upper right corner:
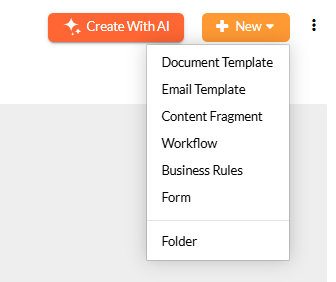
- Select "Document Template” if you’re creating a template for an entire document (this will be saved as an .epb file) .
- Select “Content Fragment” if you’re creating a section of content to be used in multiple other documents (this will be saved as an .epr file).
The template will open in the NorthStar Designer (see below).
Opening a Template in a Project
-
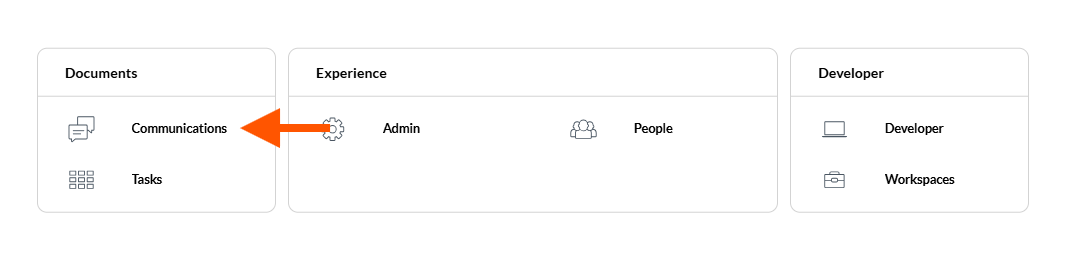
From the homepage, click on “Communications”
-
Select the “Projects” tab.

-
Select a project from the list. A panel will display all the files associated with that project:
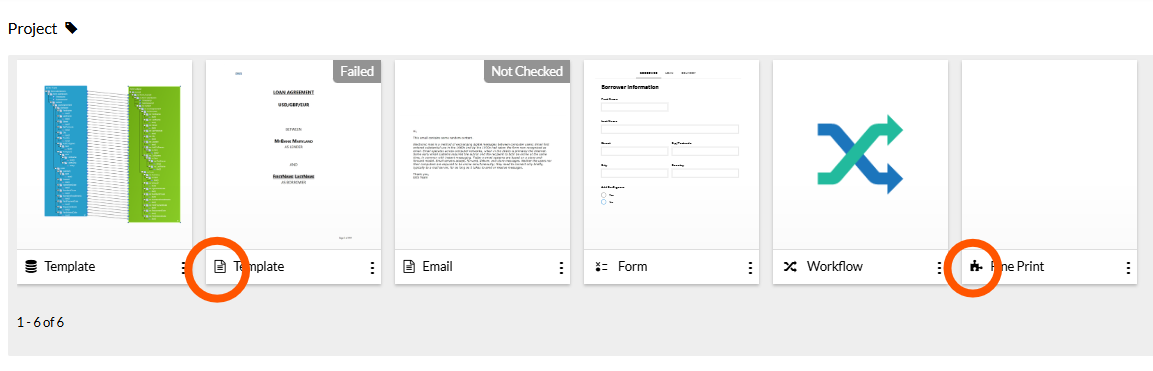 - Page icon: Document Template
- Puzzle Piece Icon: Content fragment
- Page icon: Document Template
- Puzzle Piece Icon: Content fragment -
Open one of the Document Templates or Content Fragments. To create a new document, click “New” in the upper right and select “Document Template” or “Content Fragment” from the dropdown.
The template will open in NorthStar Designer.
Building Static Content
Static content consists of the text, images, and other elements of your template that should appear the same for all recipients. This includes metadata and page layout.
To add dynamic elements that will render differently depending on linked data, see the "Adding Data and Dynamic Content" section.
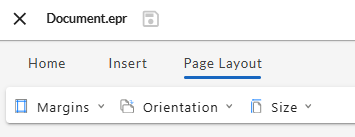
Editing Page Layout
The Page Layout tab lets you change the margins, orientation, and page size of your template.
Changing Margins
From the Margins dropdown menu, you can select Normal, Narrow, Moderate, or Wide margins.
Changing Orientation
From the Orientation dropdown menu, you can set the orientation of your document to Portrait or Landscape. The orientation that you select will be applied to every page of the document.
Changing Page Size
From the Size dropdown menu, you can set the page size of your document to Letter, A3, A4, or A5. The page size you select will be applied to every page of the document.
Adding and Formatting Text
Within NorthStar Designer, you can add basic text directly to the template and then style and format it with the suite of standard formatting and styling tools on the Home tab.

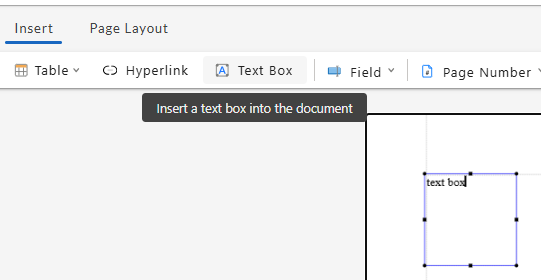
Inserting a Text Box
To add a freely moveable and resizable box for text, select “Text Box” from the Insert tab ribbon. This will add a text box to your template, which you can resize by dragging it from the corners or sides, or move it by dragging and dropping from edges.
You can format or style text within a text box using formatting and style options on the Home tab.
Checking Spelling
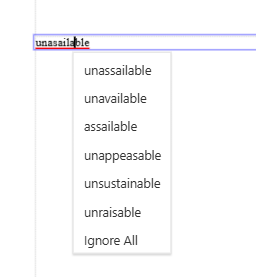
Words that don’t match the spelling of the Designer’s dictionary will be underlined in red. Left clicking on an underlined word will provide correction suggestions, if any can be found. Selecting “Ignore All” will add the underlined word to your dictionary.
Revising Text with AI
If you have enabled the MHC AI Studio, you'll find an "Open AI Writing Assistant" icon in Home tab of NorthStar Designer. Selecting this icon will open the AI writing assistant panel.
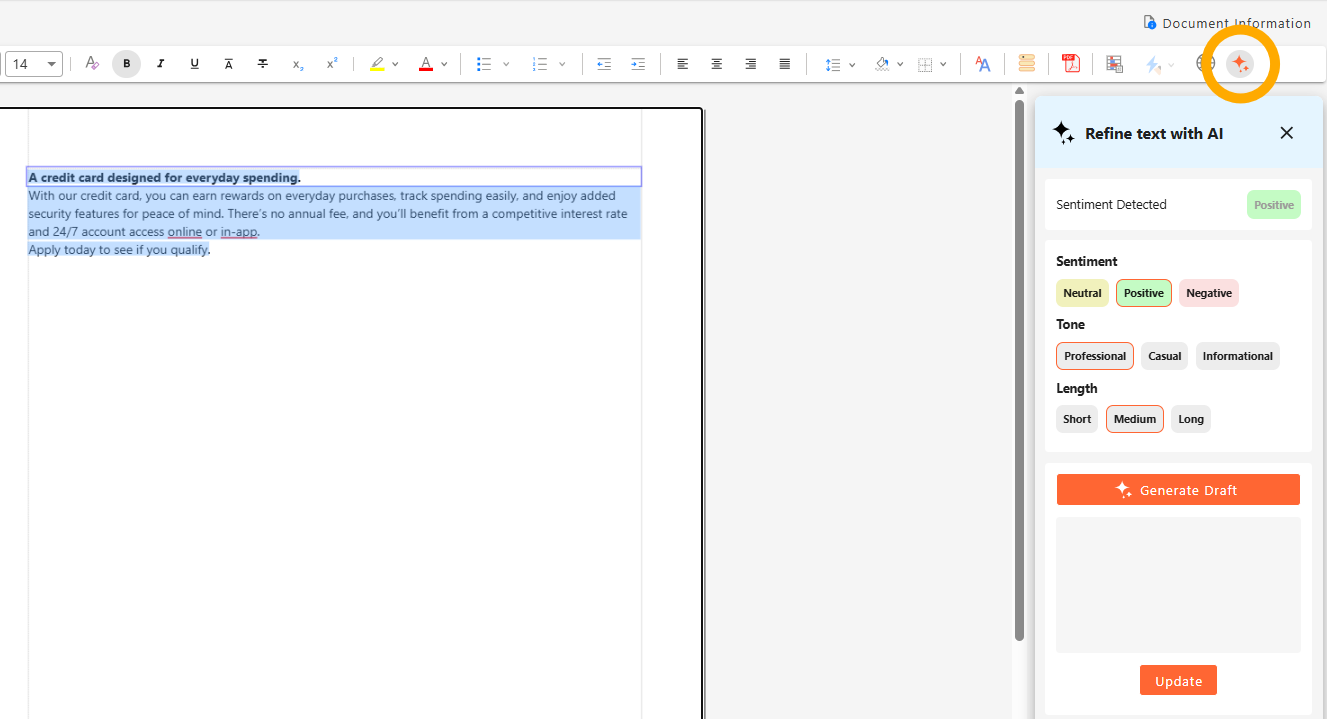
When you select text from your templates, the AI writing assistant panel will analyze the sentiment of your text. To refine your text, choose your desired sentiment (positive, neutral, negative), tone (professional, casual, informational), and length. Then click "Generate Draft" for a revised version of your selected text. If you approve of the revision, you can instantly update the original text by clicking "Update."
Inserting Images
Clicking the “Image” button in the Insert tab will open a Choose File panel. You can select any image from your NorthStar CCM files or upload a new file.
Once you’ve inserted an image, you can resize it by dragging it from the corners or sides. You can move it by dragging and dropping from the center of the image.
Inserting and Editing Tables
From the Insert tab, clicking “Table” will allow you to select how many rows and columns you’d like the table to have. You can also manually enter the number of rows and columns by selecting “Insert Table.”
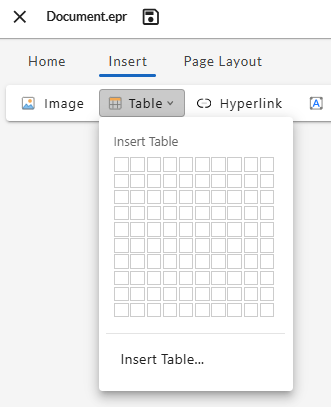
Table Header and Footer Rows
If you want the table to have a dedicated header and/or footer row, check the “Has Header” and/or “Has Footer” checkboxes in the “Insert Table...” panel before selecting “Insert. This will insert a table with the indicated number of rows and columns, plus an additional row for each header and/or footer. The header and/or footer rows will have embedded HTML tags, which can provide context for screen readers and other accessibility tools.

Column Width and Row Height
You can adjust the width of table columns by dragging and dropping the border between two columns. The height of a row will automatically expand or contract to contain the text contained in the row.
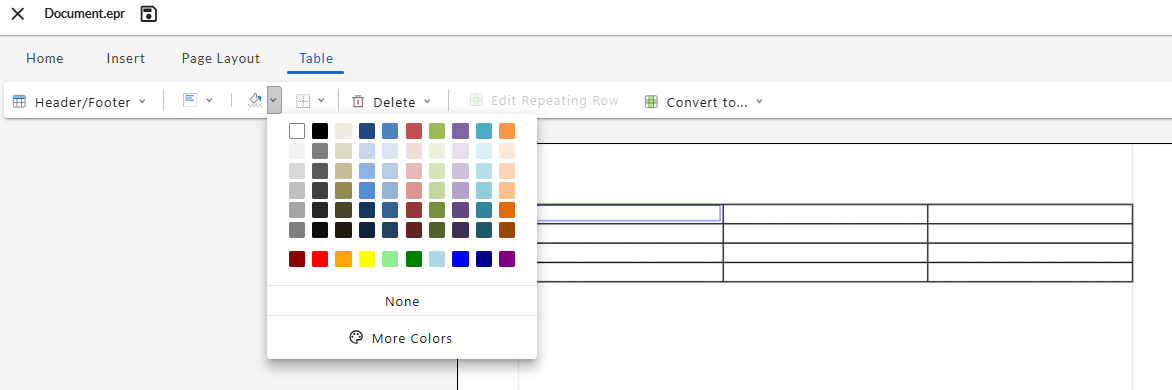
Formatting a Table
Once you add a table, selecting any cell on the table will add the “Table” tab to the toolbar. This table allows you to modify the alignment, shading, and borders of the table. The Table tab also allows you to create repeating rows (see "Adding Repeating Rows").
Adding Data Elements
Data elements or expressions can be added to tables (see "Inserting Data Fields").
Inserting Hyperlinks
To insert hyperlinked text into your document, first click on the point at which you’d like to insert the hyperlink. Then, from the Insert tab, select “Hyperlink” to open the Insert Hyperlink panel:

- Add the web address to the URL field.
- Add the linked text as you’d like it to appear in the document to the Display Text Field. Note: You can also select existing text in the document and select “Hyperlink” to add a link to that text, in which case the selected text will appear in the Display Text Field.
Once you’re satisfied with your URL and Display Text, select “Insert.”
You can test your hyperlinked text by saving your changes, generating a PDF preview, and clicking on the hyperlinked text.
Note: If your PDF is opened in a browser, clicking on a hyperlink will open the linked page in the same browser tab (replacing the PDF).
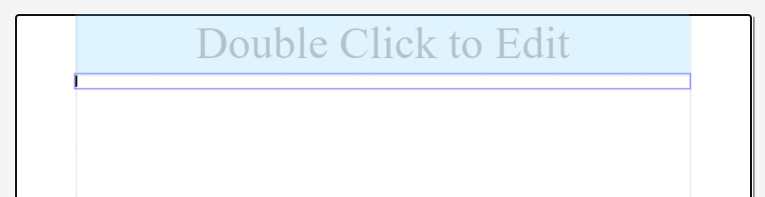
Editing Headers and Footers
To edit your document headers or footers, you’ll need to double-click the header or footer area. Whatever text you add to the header or footer will appear on each page of your rendered document. Header and footer text can be edited using the formatting tools on the Home tab.
Adding a Logo
You can add an image to your header or footer by selecting “Insert Image” from the Insert tab.
Adding Page Numbers
From the Insert tab, you can select “Page Number” to insert a page number in the format of your choice. You can also insert the Page Count to show the total number of pages in the document (i.e., Page Number / Page Count).
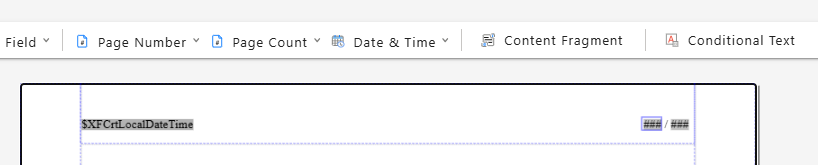
Adding a Date or Timestamp
From the Insert tab, you can select “Data & Time” to insert a timestamp in the format of your choice.
Adding data elements or expressions
Data elements or expressions can be added to your headers or footers (see "Inserting Data Fields").
Setting Metadata
Metadata is used by accessibility tools and other technologies to help identify and process a PDF. Selecting the “Document Information” button in the upper right corner of the Designer will allow you to view and edit metadata information for that template, including the document title, author, subject, keywords, and reading language.
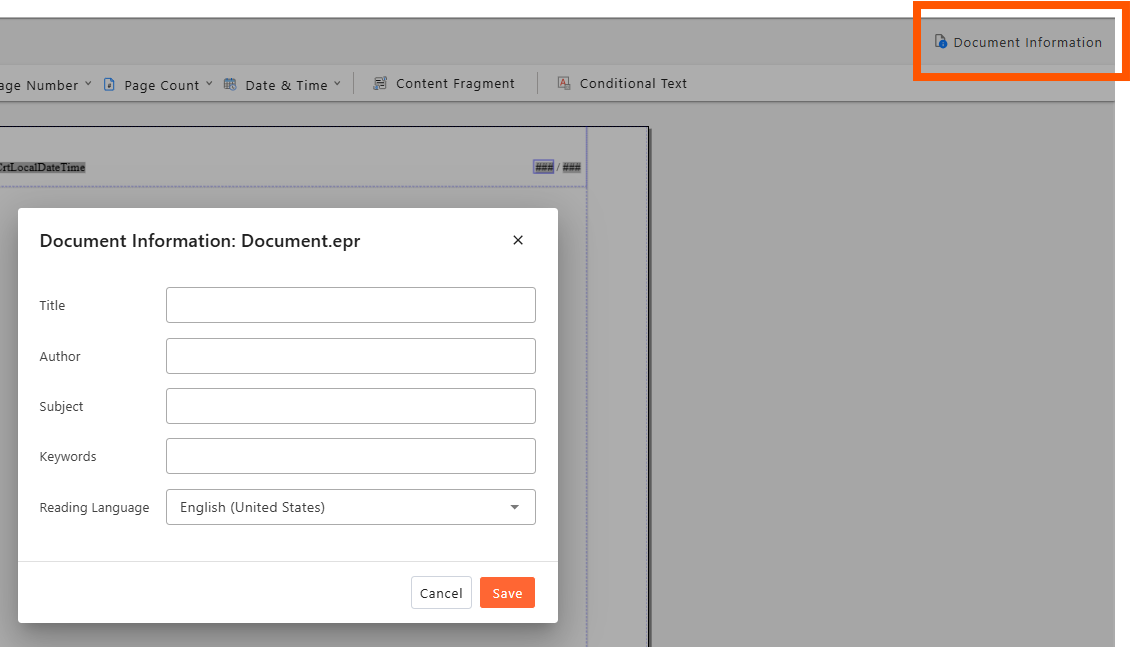
Setting a Document Title
Document title is required by most accessibility standards and is typically the first thing announced by a screen reader when the file opens.
Setting a Reading Language
This metadata element specifies the primary language of the document and is required by most accessibility standards. It is used by assistive technologies and screen readers to determine how to pronounce and interpret the text.
Setting Author, Subject, and Keywords
These metadata elements can assist in searchability and document management but are not always strictly required by all accessibility standards.
Adding Data and Dynamic Content
NorthStar Designer allows you to link your template to an .EDX or .XML data file, and then add elements from that file into your template. You can add data fields and expressions directly into the document, add conditional text or formatting, and create tables with repeating rows.
Selecting a Data Source
If you plan to dynamically insert data into your template or use data to drive conditional elements of the template, you’ll first need to select a data source.
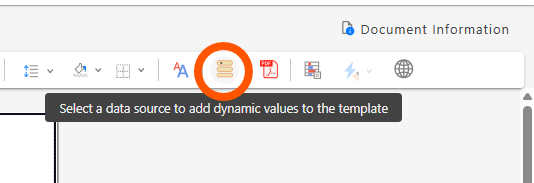
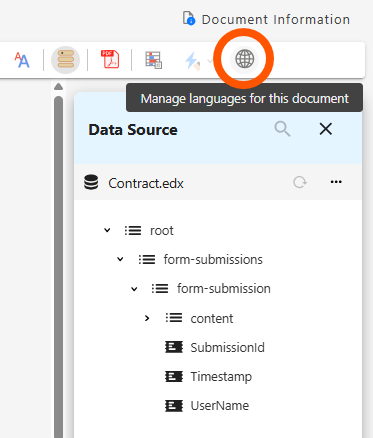
Click the “Select Data Source” icon. A panel will open on the right side of the screen. Click the “Browse” and select a correctly formatted .EDX or .XML data file in the same folder as the template (or in a sub-folder).
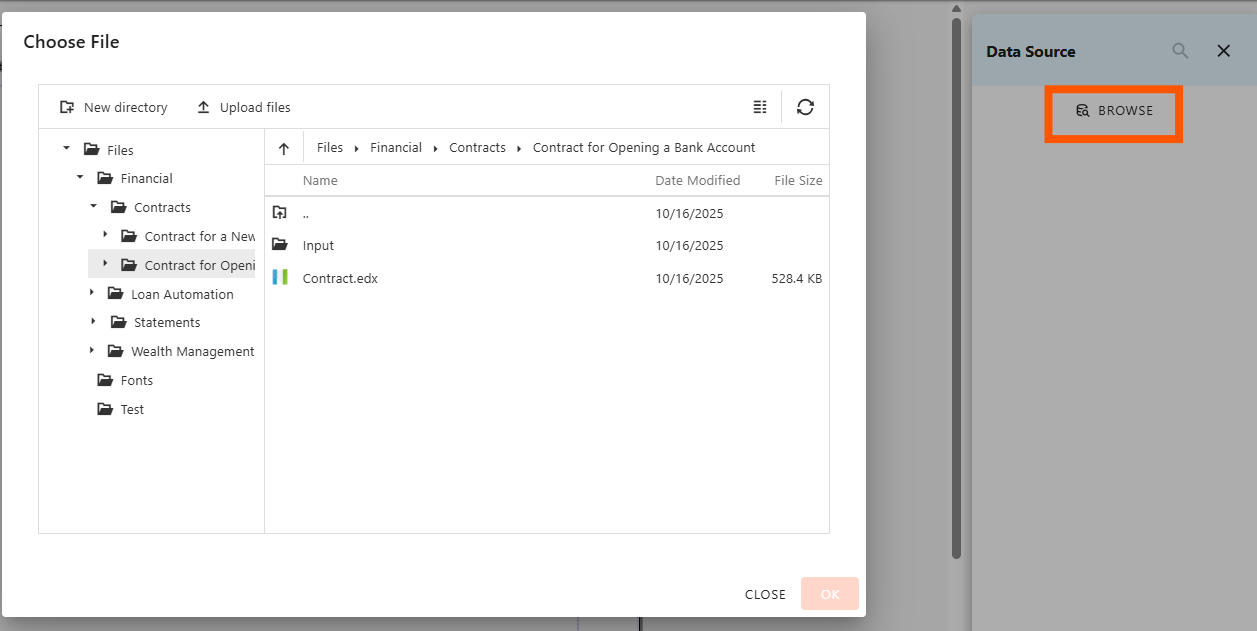
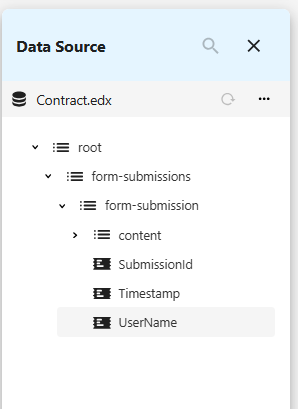
Once you’ve selected a data source, you’ll be able to inspect the data structure of the file, including the root, subfolders, and data elements in the data source panel. You’ll also be able to insert data elements or expressions into the document (see below).
Inserting Data Fields
Once you’ve selected a data source, you can insert elements from that data source into your document as fields. You can add individual elements from the Data Source panel, or you can add data elements or expressions from the “Insert Field” option on the Insert tab.
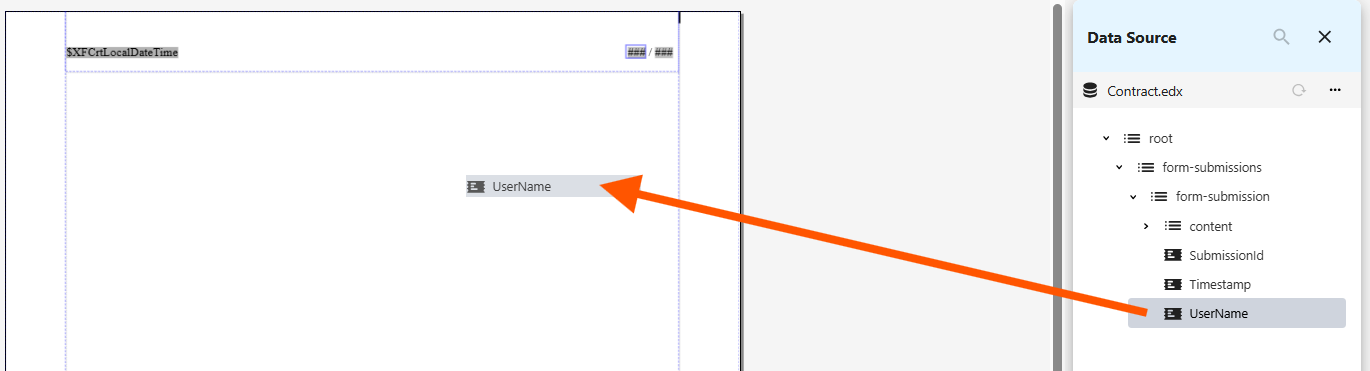
Adding data elements from the Data Source panel
From the Home tab, clicking on the “Select Data Source” icon will open the Data Source panel. From there, you can drag and drop individual data elements directly into the template, which will be adding a data field.
Once you’ve added a data field to the document, you can double click on it to open the “Edit Field” panel, which will allow you to label the field, change the selected element, or replace it with an expression. This is identical to the "Insert Field" panel (see below).
Adding data fields, elements, or expressions from the Insert tab
You can add a data element or expression as text in your template by selecting “Field” from the Insert tab ribbon. This will automatically open an Insert Field panel.
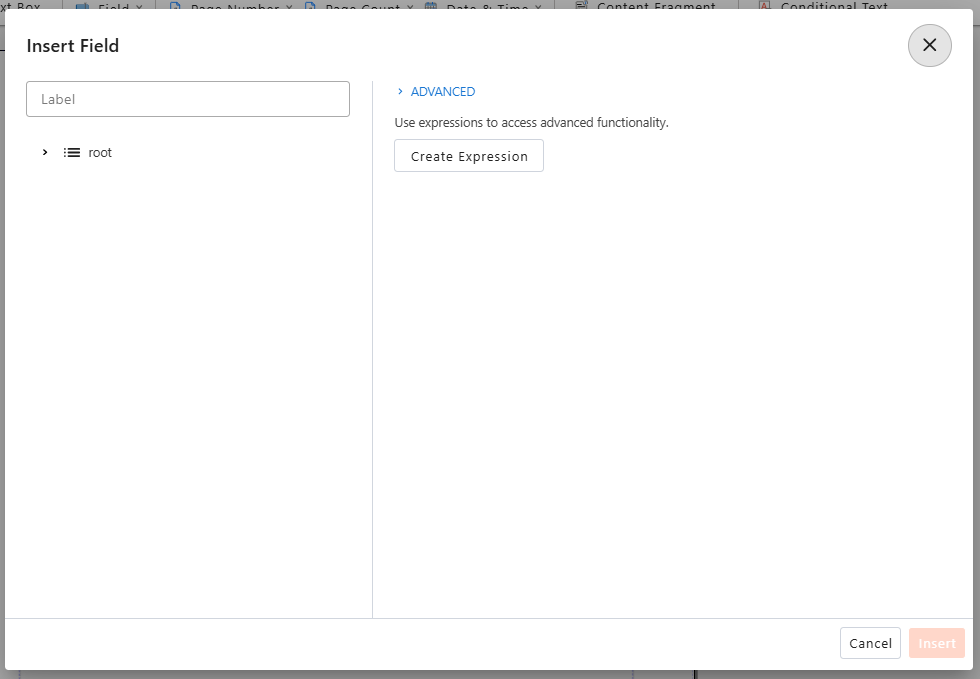
- Select an element: Choose your element from the data source from the panel on the left. If you want to simply insert this data element into the template (without modifying it with an expression), you can select “Insert.”
- Create an expression (alternative): If you want to use an expression instead of a single data element, select “Create Expression.” Insert the selected element or selected path using the icons above the expression field, and then add functions, operators, parameters, or constants, using the options listed.
- Label (optional): If a data element or expression is lengthy or unclear at a glance, you can add text to the label field to set how the field will appear in the template designer. Labels are only used for design and will never be visible in rendered documents.
Notes:
- Selecting the Field dropdown menu will display some inactive options (Current Date & Time, Current Page Number, Total Page Count). These are represented by other options on the Insert tab ribbon.
- Selecting “Custom Field” from the Field dropdown menu will bring up the Insert Field panel (the same as if you click on “Field”).
Formatting Date and Number Fields
When adding date or number data fields to your template, you can set how this data will be formatting when the document is rendered.
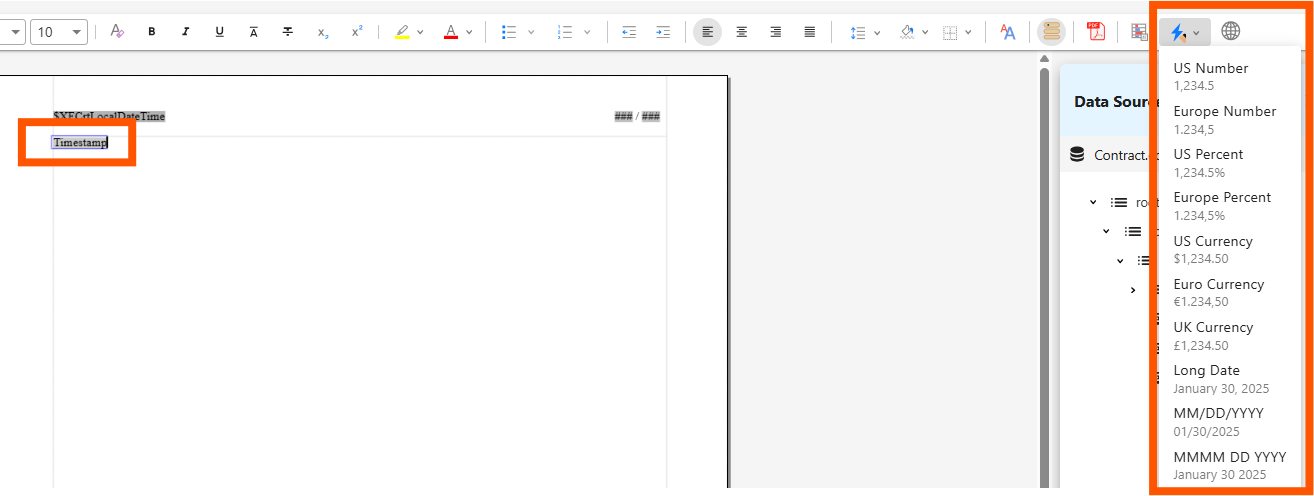
- Select the date or number data field.
- From the Home tab, select the “Apply a data format to the field” icon.
- Select a format from the dropdown options.
Inserting Conditional Text
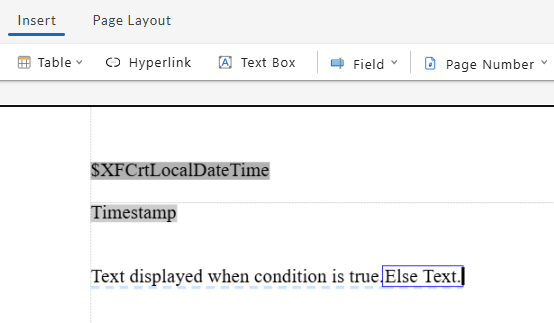
Conditional text allows you to display one of two text strings depending on whether the data meets a certain condition or not. It consists of three parts:
- Condition: An expression that checks if an element in your data source meets a specific requirement. This condition can be a simple condition (“Greater than 0”) or an advanced expression (TK provide example).
- Text displayed when condition is true: The text that’s displayed when the data element meets the condition.
- Else Text: The text that’s displayed when the data element(s) fail to meet the condition.
To add conditional text to your template, follow these steps:

- Select “Conditional Text” from the Insert tab ribbon.
- Select an element: Choose your element from the data source from the panel on the left. If you want to simply insert this data element into the template (without modifying it with an expression), you can select “Insert.”
- Create an expression (alternative): If you want to use an expression to modify the data element, select “Create Expression.” Insert the selected element or selected path using the icons above the expression field, and then add functions, operators, parameters, or constants, using the options listed.
- Label (optional): Labels aren’t generally relevant for conditional text; this field can be left blank.
- Select “Insert.”
Your conditional text will be insert with the placeholder “Text displayed when condition is true.” and “Else Text.” Replace these placeholders with the desired text.
Note: You can include data fields, hyperlinks, and conditional formatting in your conditional text. You can also leave the “Else Text” empty to create text that will only appear when a condition is met.
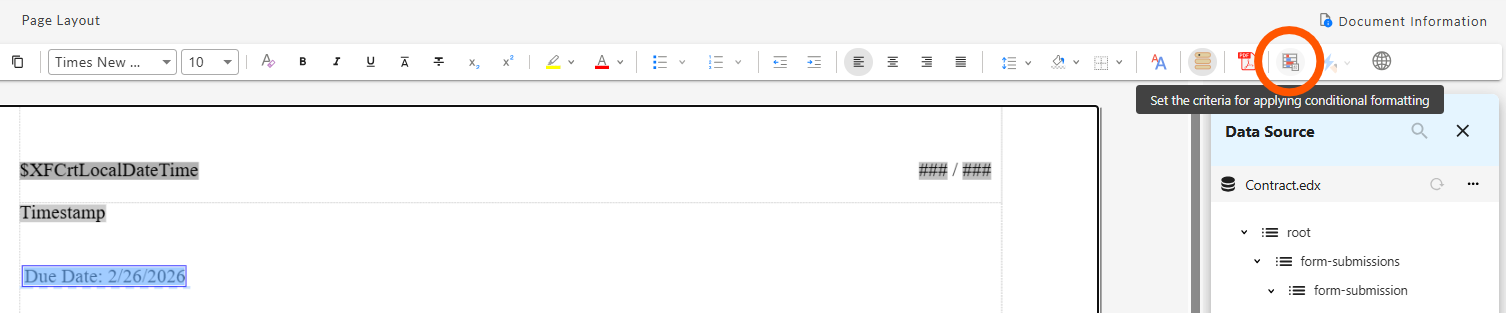
Setting Conditional Formatting
Conditional formatting allows you to apply font or background styling to a section of text based on a data value.
Example: Your document contains due date, and you want this due date to appear in red if the due date has already passed when the document is created.
To apply conditional formatting, a data source must be assigned to your template (see “Select a Data Source” above). Then follow these steps:
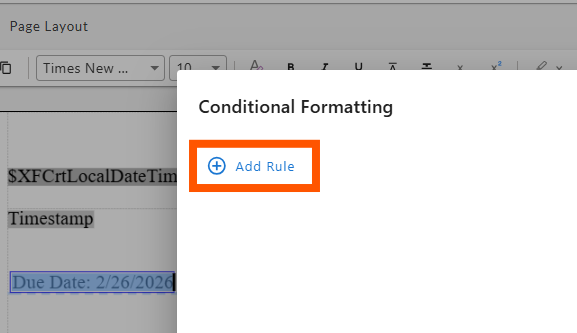
-
Highlight a section of text or select a text element, and then click on the “Set the criteria for applying conditional formatting” icon.
-
Click “Add Rule.”
-
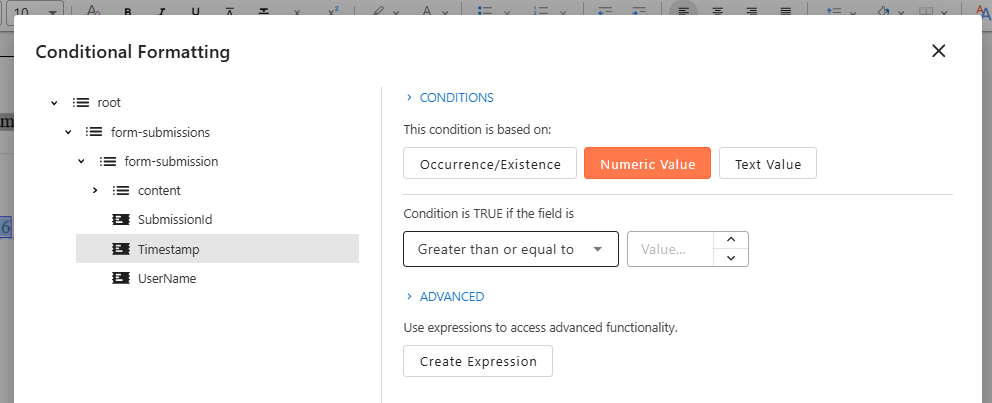
Select a data element. On the left side of the panel, expand the data source and select the element you’d like to condition against.
-
Select the condition type. On the right side of the panel, choose what the condition should be based on:
- Occurrence/Existence: Allows you to apply the formatting depending on whether the selected element is present (or absent from) the data. When selecting this condition type, you can choose from the following operators:
- Exists (the element is present in the data at least once)
- Doesn’t Exist (the element is not present in the data)
- Occurs several times (the element is present in the data more than once)
- Numeric Value (number values only): Allows you to apply the formatting based on the numerical value of the element. You can select from the following operators:
- Less than or equal to
- Greater than or equal to
- Less than
- Greater than
- Not equal
- Equal
- Text Value (text string values only): Allows you to apply the formatting based on the text value of the data. You can use the following operators:
- Contains
- Starts with
- Is empty (the data element is present but has no text in it)
- Is not empty
- Doesn’t exist or is empty (the data element has no text, or is missing altogether)
- Equal
- Not equal
- Occurrence/Existence: Allows you to apply the formatting depending on whether the selected element is present (or absent from) the data. When selecting this condition type, you can choose from the following operators:
-
Select a value (Numeric Value/Text Value conditions only). Enter a number or text string in the “Value” field that the data element will be compared against.
-
Construct advanced expression (alternative option). Selecting “Create Expression” allows you to create a custom expression instead of choosing a single data element. Custom expressions can contain multiple data elements, functions, operators, and parameters.
-
Select “Next.”
-
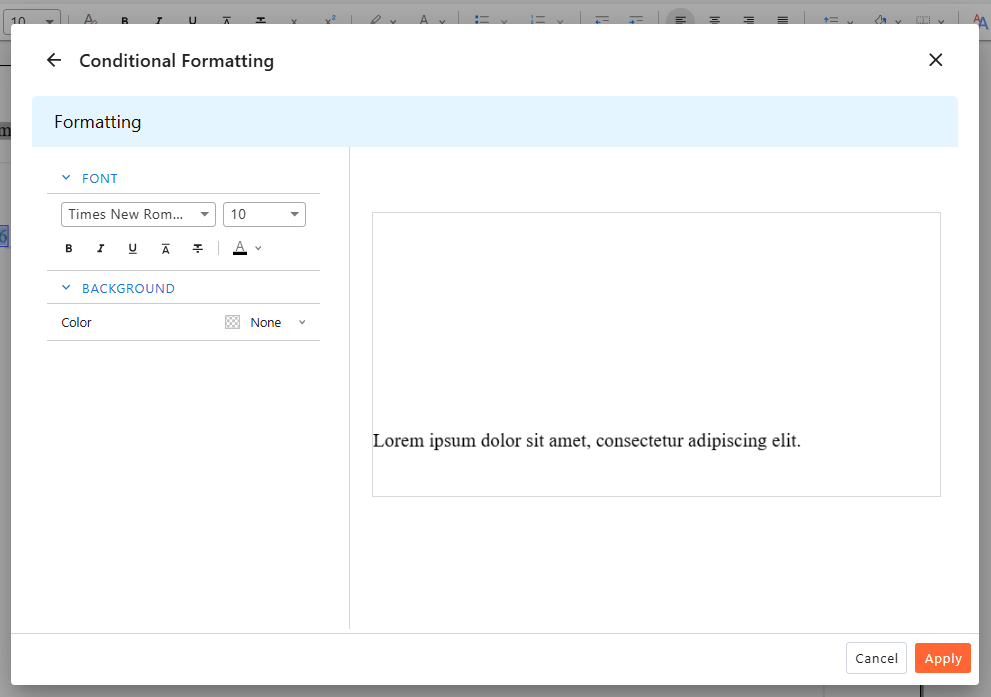
Add conditional formatting. From the Font and Background menus, set the formatting you would like to use when the condition is met. The preview panel on the right will display dummy text in your chosen format.
-
Select “Apply” to finish creating the rule.
-
Add, edit, or confirm rules: You’ll see the rule added to the Conditional Formatting window for the selected text element. From here you can add another rule or edit/delete any existing rules. Once you’re satisfied with the rule(s) you’ve created, select “Apply.”
Once you’ve applied conditional formatting to an element, that element will be displayed with a dotted underline to show its formatting is conditionally tied to data. You reopen the conditional formatting of a text element at any time by selecting the element and clicking on the “Set the criteria for applying conditional formatting” icon on the Home tab.
Inserting Content Fragments
Content Fragments are independent sections of text that can be shared across multiple documents and templates. This is an extremely helpful feature for boilerplate text like disclosures or fine print, because:
- Reusing the same content fragment is more efficient than repeatedly copy/pasting the same text, and;
- Updating the original content fragment will automatically update all templates using that content fragment.
Building a content fragment is almost identical to building a document template (see “Opening or Creating a Template”).
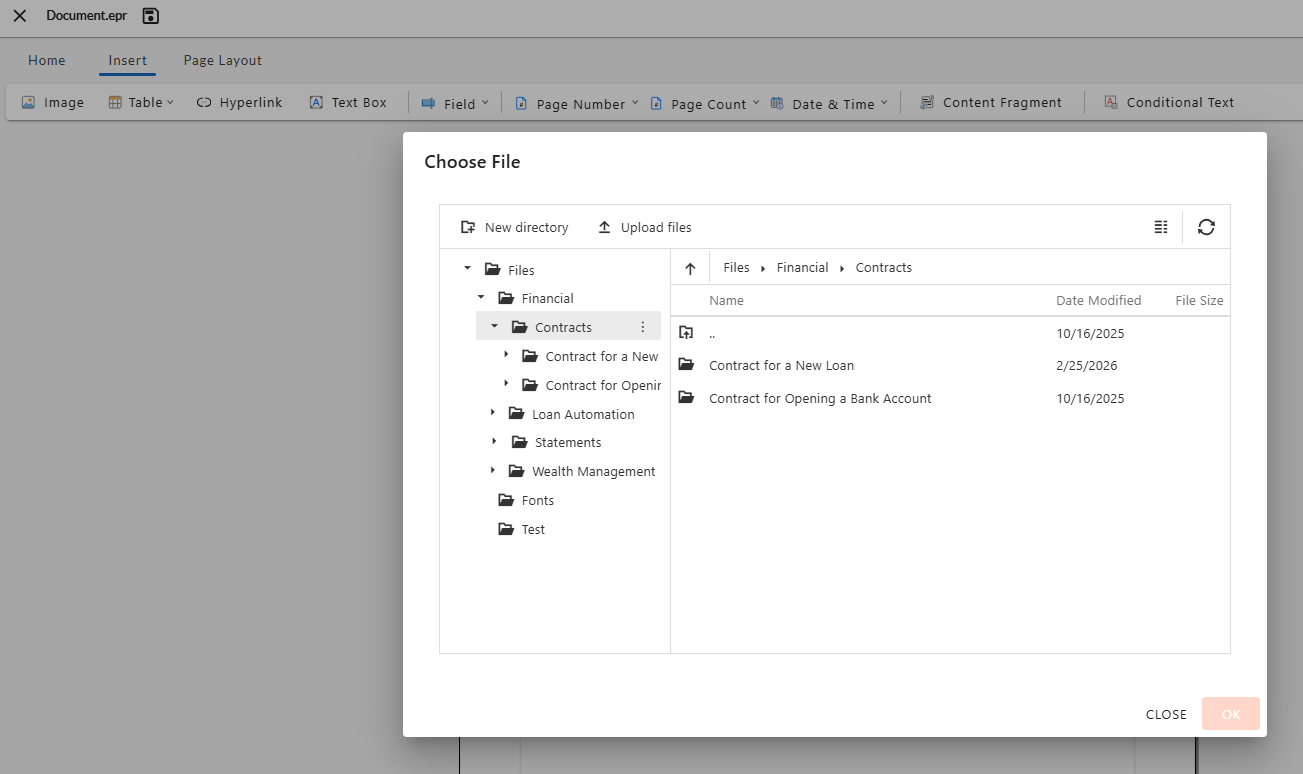
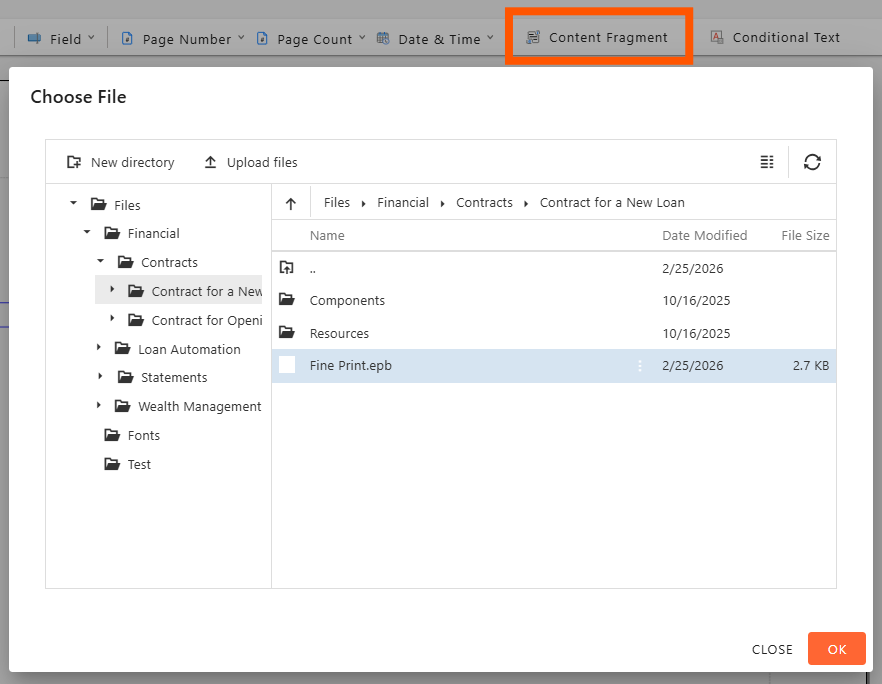
Once you’ve created a content fragment, you can add it to your document template by selecting “Content Fragment” from the Insert tab ribbon of NorthStar Designer. Then select your content fragment from the “Choose File” panel and click “OK.”
Note: Content fragments cannot be edited or modified for your document template. To change a content fragment, open and edit the original content fragment. This will change the content fragment for all templates using it.
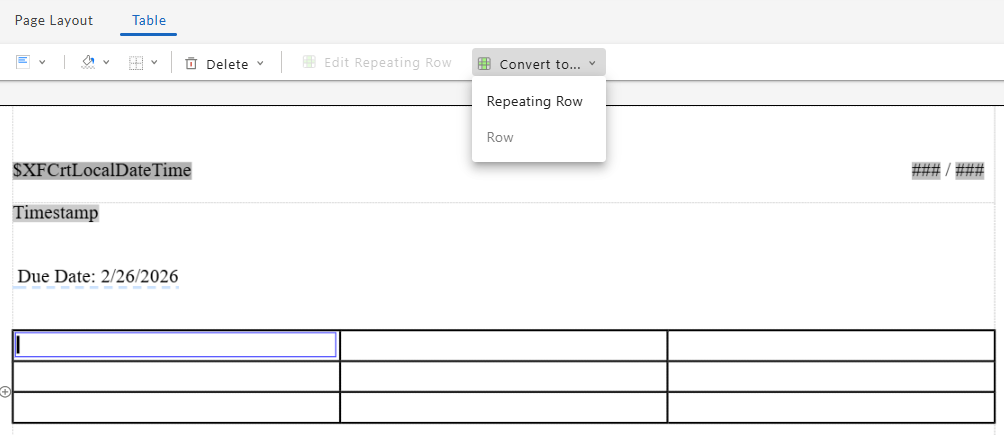
Adding Repeating Rows
Repeating rows are table rows that dynamically duplicate based on the data source they are connected to. Repeating rows can be used to create dynamic, personalized communications when the number of items on a list or table varies based on the recipient, such as line items on an invoice or transactions on a banking statement.
To create a Repeating Row, follow these steps:
-
Select a table row, and then select “Convert to...” from the Table tab. Select “Repeating Row” from the dropdown menu.
-
Select a data element: On the left side of the panel, expand the data source and select the element you’d like to base the repeating row on. Once the data element is selected, an empty row will be added to your table for each object in the data element (when rendering). You can specify the contents of this row in the next step.
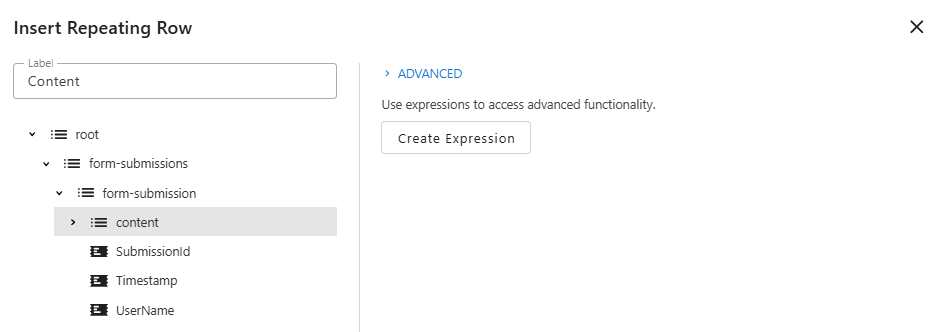
-
Create an expression (optional): You can apply an expression to the data element if you wish to modify or filter it.
-
Add label (optional): This label will only be visible when editing the repeating row; it will not be visible from the template view or in the rendered document.
-
Select “Insert.”
Once created, the row will be highlighted to indicate that it is a repeating row; this highlight is only visible within the designer and will not be visible in the rendered PDF.
Managing Languages
NorthStar Designer allows you to build translations for each of the text strings in your template. These translated strings can be used when rendering the PDF to create versions of the PDF in multiple languages.
Once you’ve added text to the document, follow these steps:
-
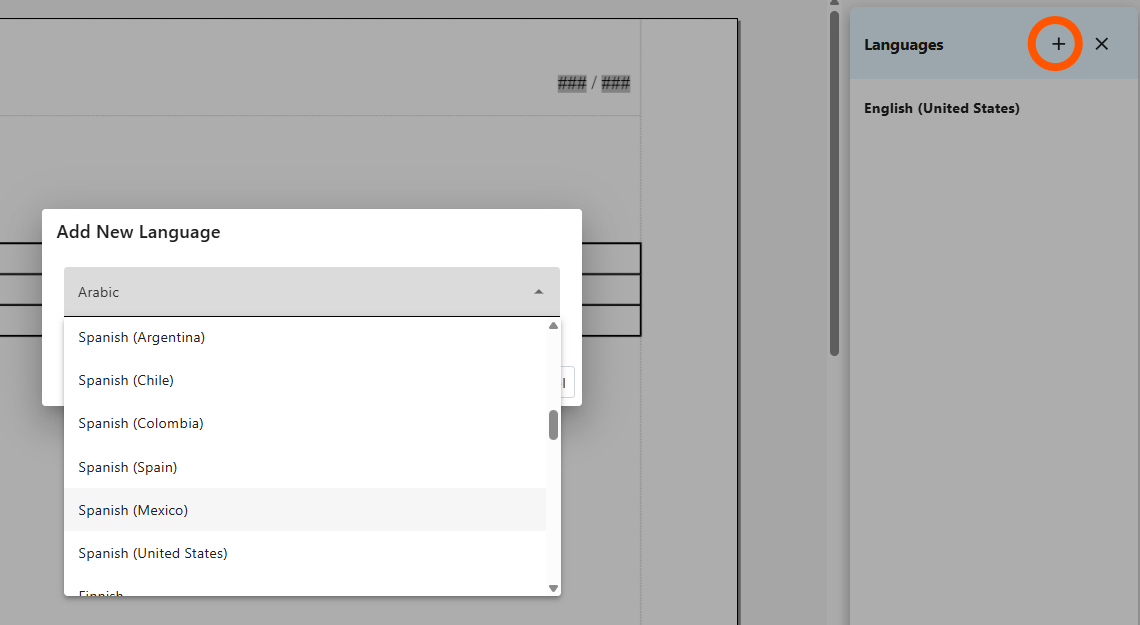
Click on the “Manage Languages” icon on the Home tab. The Languages panel will open displaying your primary language in bold.
-
Click on the + icon to add a language. Select an icon from the drop-down menu and select “Save.” Note: There is currently no way to remove a language from a template once it has been added.
-
Once a language has been added, select the language from the panel.

-
A Language Properties panel will open with the original text of each text string in your document.
-
For each text string, enter the desired translation of that string into the translation column. Note: The checkboxes beside each string support an upcoming feature and currently have no function.
-
When you are satisfied with translation of each string, select “Ok.” Your translated string will be saved in the template. Repeat for each language you’d like to support.
Note: If you change a text string in the designer after translating it, the original text string and translation will be preserved in the Language Properties panel, and the new text string will display without a translation. Before rendering a template in multiple languages, ensure that there is a translation for each text string used in the template.
Adding Translations with AI
If you have the MHC AI Studio enabled, when you click on the "Manage Languages" icon in the Home tab, you'll see an "AI" button on the Language Properties panel.
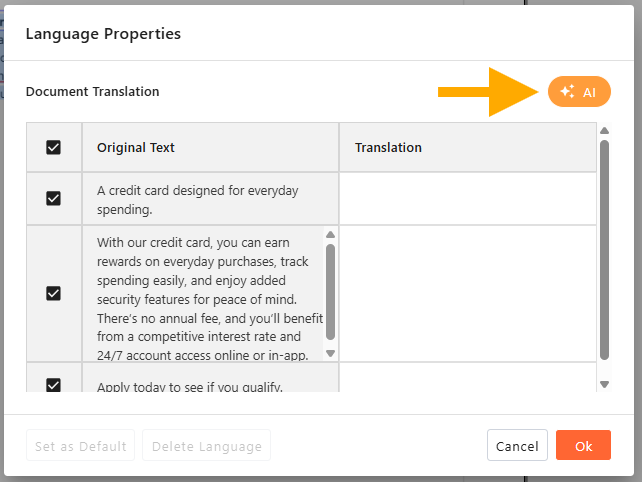
Clicking the AI button will immediately generate an AI-provided translation for each text string in your document. Note: This action will overwrite any existing translations.
If you approve of the translations, you can save them by clicking "OK," or you can manually revise any number of translations before saving. You can also click "Cancel" to discard all changes and revert to the prior state.
Saving and Previewing your Template
To save your template, click the disk icon located in the upper right corner of the screen beside the template name. You must save your template before previewing it.

Clicking the “Preview Template” button on the Home tab will create a PDF preview of your template.
Note: the DOCX and HTML preview options in the dropdown menu are in development and not currently functional. There is currently no way to preview a template in another language.
Once you’ve saved the template, click on the Preview Template icon. A PDF preview of your template will be generated in a new browser window. Note: If you are using an .EDX file as the data source and have AI studio enabled, Designer will auto-generate sample data when displaying the preview. Otherwise, the linked data will be used for the preview.